Showing posts with label graphics. Show all posts

Saturday, July 1, 2023

Making a potato livecam with the Commodore 128 VDC and ComputerEyes

If we're going to make the little old 8-bit MOS 6502 into Skynet — because we already know what the Terminator T-800 CPU is — then it's gonna need to see. How can it exterminate the last remnants of humanity without vision?

And we'll use something period-correct, too. While our favourite Cyberdyne Systems Model 101 was busy stalking Sarah Connor in 1984, the product it might have (slowly) viewed the world with was already on the market: the Digital Vision ComputerEyes. Check out the little beige camera perched on a stack of disk boxes, attentively surveilling the room at just a few, uh, seconds per frame as displayed on the monitor. Plug in a composite video source, connect it up to your Apple II, Commodore 64 or (in 1985) Atari 8-bit, and wait about six or seven seconds to identify targets — or almost fifty for the highest quality. If Skynet had chosen this option we might never have had Judgment Day.

The slow capture speed meant it was never intended as something to view live, and on the Commodore and Atari versions, DMA interference meant you could only capture with the screen off which would seem to make any live-ish feed impossible. But the Commodore 128 has a second video chip that doesn't interfere. Let's turn the Commodore 128 into a really slow potato-quality live camera you can interactively watch and freeze-frame — and then, in exchange for 11% of the screen, make it capture almost 25% faster! Time-lapse video proof at the end!

Sunday, October 4, 2020

Stereoscopic computing: converting Quake and Doom

This article is part of a series -- you can read other entries

In our first 3D article, we talked about the basics of stereoscopic computing, including anaglyph rendering and active versus passive displays, and demonstrated a tool for turning a twinned set of webcams into a 3D image.

Games, of course, are the most obvious application, but early 3D games mostly dealt with the phenomenon as overlapping 2D planes due to the lack of 3D acceleration, limited CPU power and the predominance of 2D sprite hardware in contemporary video chips. These almost all used anaglyph colours (red/cyan glasses and others), but a few exploited the Pulfrich effect, and we'll look at some examples of these with the Commodore 64 in a later post. Even true stereoscopic systems like the Virtual Boy still largely used scaled planar images rather than true 3D graphics even though their separated video pathways yielded much better results (and eyestrain). As our previous article discussed, we try to avoid anaglyph rendering because all of them have some level of colour distortion (because they use colour differences to deliver a different picture to each eye) and ghosting (because that process is imperfect), and Pulfrich rendering, for reasons we will discuss, has only limited applications. For these examples, we will continue with my trusty Mitsubishi Diamondcrysta RDT233WX-3D, a passive polarized 3D display, though this should work for any passive 3D monitor or television. The general principles also apply to active systems like Nvidia 3DVision, though the details will be peculiar to each particular vendor-proprietary system.

One of the earliest games to have a true 3D mode built into it was id Software's Quake, and, perfect for alternating line polarized passive displays, it interlaced the left and right eye views. However, it was actually created for active glasses alternating between left and right views in sync with the alternating scans of a CRT monitor (here is one such scheme), though this method can still be simulated with a line blanker with modern display cards and LCD panels. This code persisted into early source ports of Quake when id released the code under the GPL, such as in the software-rendered SDLQuake, and is enabled by going to the console and entering lcd_x 1 (the higher the value, the greater the stereo separation). SDLQuake can still, with some effort, be built on modern systems but is strictly limited to 640x480. Naturally, interlaced images will not appear in 3D on a 2D monitor, and may need to be downloaded and moved to the right vertical position to match the polarization order of your screen. For reasons that will become clear in a moment, these were captured during demo playback and could not be paused, but they still serve for purposes of comparison even though the scenes are not exactly identical.

lcd_x 0 (default, 2D only)

lcd_x 1

lcd_x 5

The highest stereo separation yields great effects for most of the display but makes the weapon uncomfortably close, which even without 3D glasses you can tell by how widely spaced the left and right views of it are. For my money the game is really only playable at the lowest separation setting, except that on modern 64-bit systems, SDLQuake and other early releases are not playable at all; they crash immediately when trying to start a new game because they are not 64-bit aware.

Modern Quake ports have corrected this problem but in turn have eliminated much, if not all, of the original stereoscopy support. A few have secondarily added back 3D using alternative means. One such port is Quakespasm, a continuation of the older Fitzquake, which in turn descends from id's GLQuake. Unfortunately, it only has an anaglyph mode (set r_stereo to a non-zero value in the console) and the old interlaced mode is gone. Let's fix that!

Pure software rendering would deal with this problem by taking two images and going to bottom copying one view to odd lines and the other to even lines. A faster approach on systems with SIMD is to blit over one screen entirely using those nice fat vector registers and then line in the other appropriately, which is the approach we took in Camaglyph. However, this is using OpenGL, so we have an additional option of using the stencil buffer. A stencil buffer approach would draw alternating lines in the stencil buffer and then map the left view and right view depending on whether there's a line in the stencil buffer or not. GLQuake does not itself make use of the stencil buffer (too early) and Quakespasm only uses it to prevent intersecting shadows, so we can easily remove that small amount of code to have exclusive control of the stencil buffer since the shadow intersection code is infrequently of rendering relevance.

I don't claim this to be the best way of accomplishing it, but here's my patch against current versions. You will, of course, have to build it yourself from the source code. To enable it, go into the console (usually the tilde key) to set the appropriate options. r_stereo, same here as in regular Quakespasm, sets the stereo separation. I wouldn't make this much higher than 2.0; even that gave me a little bit of a headache, but since it's helpfully a float value 1.5 (in the console, type r_stereo 1.5) is a nice compromise since 1.0 doesn't really have enough depth. To enable interlacing, set the new cvar r_stereomode to either 2 (L-R) or 3 (R-L: my Diamondcrysta is R-L), or set it to 1 for the old red-cyan anaglyph. Because it allows larger screen displays the 3D-enabled Quakespasm is much more immersive and is really quite fun to play. For this screenshot I set the separation to a value of 2.0 so that the effect is a little more exaggerated.

This should work on any system (Mac, Windows or Linux, which is my usual environment) and on any graphics card of vaguely recent vintage.

I mentioned Doom in the title, which is more "2.5D," and mixes flat sprites (characters, objects) with 3D environments. There are many modern ports of this but the one I've come to recently enjoy is GZDoom, which as a built-in feature now has row interlacing as well as many other 3D modes in current releases of its renderer. To do this, pull down the console (tilde key) and enter vr_mode 12. Row interleaving in GZDoom is L-R, so I also add vr_swap_eyes true to make it R-L. You can also add this to gzdoom.ini wherever your system stores it (on Linux, ~/.config/gzdoom/gzdoom.ini). Because it tries to centre the window by default, however, I made a tiny patch to force everything to the 3D monitor which I use as a second, spanned display.

In future articles we will explore 8-bit ways of achieving 3D, and consider an alternate approach for when you want to convert a game to stereoscopic 3D but it's already using the stencil buffer.

Tuesday, August 11, 2020

PAL RF or bust with the LCDT600: unscreenshotable part IV

This is part of a series — you can read prior entries

For the Secret Weapons of Commodore, part of the updates for the 15th edition involved the Commodore TV Game series, Commodore's unusual and infrequently seen family of Pong clones based on their own MOS 5601 and 7601 Pongs-on-a-chip. It would have been nice to get screengrabs of these, but not only are they strictly RF (i.e., analogue television), they're PAL, and I'm here in the United States of COVID-19. While many PAL TV sets could be dual-mode, NTSC sets almost never were, and nowadays everything is digital anyway. So what to do? Get a TV tuner that emits some other signal you can capture. And, incredibly, such a thing exists: the LCDT600 and LCDT601.

These are rebadged by a variety of distributors but except for some case and button differences are the same basic unit, and most retail for around US$60. As the ports on the rear show, the LCDT600 is a multifunction device that takes input from either composite CVBS video, S-video, VGA (using a strange mini-DIN port, but a converter is in the box) or RF, and then emits it to VGA at a variety of resolutions. Audio is supported, though not needed for our particular purpose, and the unit also allows you to overlay video from another source on top of the VGA output for "picture-in-picture." The LCDT600 and its newer but otherwise identical sibling LCDT601 emit at resolutions from 800x600 through 1920x1200, all at 60Hz, controlled by a chintzy little mini remote. Most of the machine's functions are controlled with on-screen menus, so don't lose it.

We are most interested in the tuner, and the LCDT600 does well here too. Out of the box it has a standard PAL female jack, which the TV Games connect to readily, but can be converted to an NTSC F-style jack with a simple converter (also included). It tunes NTSC and PAL B/G/D/K/I. Some primitive post-processing is available to smooth the images, but I didn't really test this thoroughly.

Capturing the stream, then, is merely a matter of capturing the VGA output. Fortunately, we already have a device for that: the INOGENI VGA2USB3. And since the LCDT600 emits at 60Hz, the signal is fully compatible with the VGA2USB3, so no further conversion is required. I was able to view the stream in VLC on my Raptor Talos II workstation and take direct screengrabs from there.

However, the next problem is I have no idea what channel the TV Games transmit on, let alone the frequency. Fortunately, the LCDT600's auto channel scan comes to the rescue, after I changed the on-screen language to English instead of Chinese and set the TV standard to PAL-G (since these were Western European devices):

With the TV Game console connected and turned on, the LCDT600 easily found the channel it was transmitting on and presented credible pictures. There is some smearing with bright white but otherwise relatively little chroma noise. Here are some full-res grabs, the top two from the TV Game 2000K and the bottom from the TV Game 3000H:

If all you've got is RF or bust, then the LCDT600 is probably the best and easiest solution, and the price isn't exorbitant. Nothing will make super-sharp images but at least you'll have them.

On a related note, if you can't get a look at the main chip on the TV Game 2000K board because the motherboard is soldered in place underside up, use a little cheap USB camera probe to get a look at the other side:

Now go read the 15th edition updates for the Secret Weapons of Commodore.

Saturday, May 2, 2020

SAIC Galaxy 1100: finally screenshots of the unscreenshotable, part III

This is part of a series — you can read prior entries

In our last entry we were testing the Inogeni VGA2USB3 on various SunRay devices and the Apple Network Server. However, it seemed to have met its match with the SAIC Galaxy 1100 portable workstation. Or did it?

The SAIC Galaxy 1100 [updated to our later comprehensive entry] and its less powerful sibling Galaxy 1000 are MIL-SPEC portable versions of the HP 9000/712 "Gecko" PA-RISC workstation built as part of the United States Navy's $672 million TAC-4 computing initiative in 1994. Hewlett-Packard had no portable workstations in its product line at the time and subcontracted with Science Applications International Corporation to create a ruggedized, self-contained version of HP's then-most common PA-RISC desktop system. As such, Galaxys have all the features of the Gecko but also add a built-in keyboard and trackball, a really nice 1024x768 8-bit colour LCD flat panel display in the lid and two PCMCIA (!) slots. On the rear, besides Ethernet, AUI, SCSI, audio and power ports, the Galaxy systems have PS/2 connectors for an external keyboard and mouse, switches to choose internal or external devices, and a VGA out. This enables you to not only use it as a self-contained luggable but also to plug in a monitor, keyboard and mouse and operate it as a more or less conventional desktop. Sadly, there is no internal battery option, but it probably would have made it prohibitively heavy even for the military.

Given this choice of configurations, you would think that the VGA port mirrors the internal display (on a regular Gecko there's only the VGA port, and that's your only display), and, well, you (and I) would be wrong. The VGA2USB3 just displayed a blank screen no matter what was on the internal display. After messing around at the boot administration prompt and looking at the output of the monitor command, it occurred to me that the SAIC Galaxy reports two displays. Stranger still, the internal built-in display is actually treated as the alternate display, not the primary one. I selected the great common denominator of displays, 640x480 at 60Hz, for the "primary" display and left the internal display at its current setting (monitor 5 11) and told the boot admin to use the external VGA out with path console graphics (as opposed to graphics1, which turned out to be the internal display). Note this is completely unlike the Gecko with its single video port, by the way. I finished with a reset and ... we have a screen!

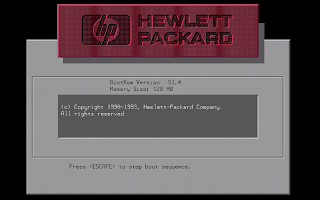
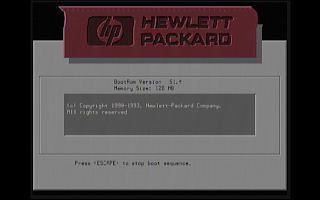
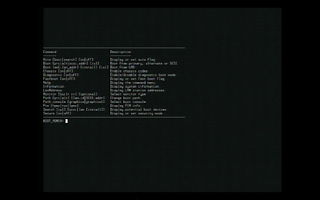
Again, there's no way you're grabbing this initial boot screen with anything but an external capture system. Ditto for the boot admin menu:

Sync-on-green was thus absolved as the issue; it was just an unexpected configuration. As you can see, the image is nice and sharp and captured at 1920x1200 with pillarboxing preserving the original 4:3 aspect ratio. The only flaw was a missing set of left-most pixels.

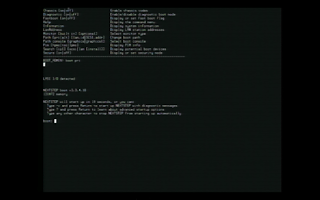
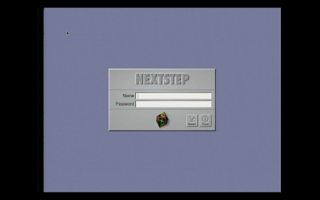
The next step was to see if I could capture the operating system's boot sequence as well. This machine usually runs NeXTSTEP 3.3, the only version that supported PA-RISC (it can also run HP/UX and NetBSD, but where's the fun in those?). NeXTSTEP wouldn't be particularly entertaining or representative of the Galaxy experience in 640x480, so at the boot admin prompt I selected mode 2 this time (1024x768 at 75Hz). When I restarted the machine, however, everything was blank again! I blindly hit ESC to get back to the boot admin prompt and set it back to mode 5, and the screen reappeared. I then methodically tried all the other non-flat panel modes and discovered exactly none of them worked except mode 5.

If you looked at the list of modes above, you may have already discovered what's special about mode 5: it's the only display mode that's 60Hz. None of the VESA modes, not even the 42Hz mode, would work either. Although the slip of paper in the box that Inogeni purports to call a manual suggests you can go to VLC's advanced settings and try to match the frame rate like so:

... it made no difference. Despite Inogeni's statements to the contrary, the capture frame rate is 60Hz or bust. (Fortunately, both the SunRays and the Apple Network Server in the prior entry were already at 60Hz, so I could grab from them just fine.) This doesn't look like a deficiency of the Linux version of VLC because the macOS version couldn't see anything either, and it's entirely plausible that this limitation might be a consequence of being vanilla USB Video Class compliant.

Since the refresh rate was now obviously the problem, my first thought was to find some sort of conversion device that, along the lines of a digital telecine, would drop or merge the frames together and put out a 60Hz signal. I'm fairly certain such devices exist but none obvious popped up with some cursory searches on eBay, and I didn't want to spend a lot of money on a professional solution that may or may not work. (I'm already out for the damn Video Ghost and this box, you know.) Eventually it occurred to me that a cheap way of figuring out if I was on the right track would be a VGA-to-composite converter, and to connect it to the CVBS input the VGA2USB3 already has. The images almost certainly wouldn't look very nice but it would at least demonstrate if the idea was feasible.

VGA-to-composite converter boxes are almost literally a dime a dozen on eBay and Amazon and come in two major types. The majority are a little squarish box (usually black or white, though the $14 one I ended up getting turned out to actually be lavender) that takes VGA and a 3.5mm audio jack on one end and has CVBS and stereo phono jacks on the other. They will output in PAL or NTSC using a tiny switch on the side and claim to work without external power, though mine didn't put out any signal until I connected it to a USB port on the Talos II. There are a billion variations of this type and they appear to all perform identically, which is to say not too good. The top image was 1024x768 at 75Hz, the second at 70Hz and the third 640x480 at 60Hz for comparison to the images before. I selected PAL for the greater number of vertical lines which fortunately the VGA2USB3 accepts.

Besides the appalling resolution, which sadly is not unexpected due to the massive downsampling of the video signal, all of these grabs have various additional technical problems. The 75Hz image had the least image distortion but had an obnoxious green cast. However, even though the 70Hz and 60Hz images showed proper colours, these warped the display at the top, and all three refresh rates had occasionally irritating flicker like an old analogue TV set not properly tuned to the right channel. Switching to NTSC mode made no difference. The "NO SIGNAL" colour bars this unit displays were stable except for some dot crawl, so it appears to be something about the VGA conversion itself.

Nevertheless, I went ahead and continued in 1024x768 at 70Hz to approximate the appearance of the internal display. Here's the NeXTSTEP bootloader:

and the boot screen:

and the login screen:

Again, there would be no way to capture these snapshots without an external system, but they're so muddy I might have done better just trying to take a picture of the screen with my mobile phone.

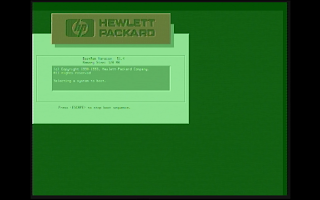
That said, the quality of the composite capture device matters, and it turns out the VGA2USB3 isn't particularly good at composite capture compared to other units. For capturing composite video on my Quad G5 I use a Canopus ADVC-300 over FireWire 400. While the American version of the ADVC-300 is strictly NTSC and it uses a DV-aspect ratio which is not 4:3, it manages to pull out considerably more detail. Here's the initial Hewlett-Packard logo, the NeXTSTEP boot screen and the NeXTSTEP login screen captured from the G5 instead:

This is certainly better, likely due to the ADVC-300's rather more effective comb filter, but the quality is still comparatively dire overall.

The second type of common VGA-to-composite converter is a little more deluxe. These actually have a simple on-screen display "OSD" and options for adjusting screen size and picture, and usually one or two DIP switches to set PAL or NTSC. They emit in S-video, composite and VGA, and are USB or 5V wall-wart powered (don't confuse these with similar devices that convert to VGA and may even be in the same form factor). My initial hope was that you could fiddle with the settings and get a 60Hz picture out of the VGA-out, but it turns out it's just a passthrough.

So, back to CVBS/composite. 75Hz not only had the same green cast that the cheaper box did (suggesting they may have a common designer) but had such an unstable image I'm not going to even bother showing it here. 70Hz was generally functional. Here's PAL grabs on the VGA2USB3.

Surprisingly, the detail level is not appreciably better and in some places looks a little worse, but the colour is less washed out, so I'd call it almost a draw. I then tried NTSC grabs on the ADVC-300 with the G5. This turned out to have an obnoxious issue where the picture juddered badly depending on the vertical size of the image and it reset every time the signal dropped, particularly annoying for grabbing the very first startup screen since you have to quickly adjust the image in the OSD (tip: make it as large as possible and then back down quickly until the picture converges, then turn off the OSD). However, this type of converter also offers S-video with separated luma/chroma for improved image quality, so we'll use that input on the ADVC-300 for these grabs (which the VGA2USB3 does not support).

And a shutdown image, since these are also usually impossible to get without an external capture system:

Although still poor compared to the VGA direct grabs, these are probably the highest quality images we can get from this converter.

Let's conclude with an acid test. Compare these (almost) exactly identical screens of NeXTSTEP and OmniWeb, first with the deluxe box captured by the VGA2USB3 at 72Hz, the ADVC-300 over composite at 72Hz (using the built-in zoom as a comparison), and the ADVC-300 over S-video at 72Hz, and then with the cheap box captured by the VGA2USB3 at 75Hz and 72Hz and then captured by the ADVC-300 at 72Hz:

Then compare those to this direct snapshot of the framebuffer using NeXTSTEP's built-in Grab utility:

Overall, I'd have to say the cheaper box, for all its idiosyncracies, did a better job on detail. Colours are better on the deluxe box, but even with sharpness driven all the way up the lettering is crisper on the cheaper one, and colours are easier to correct in post-processing than messing around with sharpening filters. The cheaper box is also easier to use, and, uh, cheaper. However, the cheaper box also has screen distortion, flicker and artifacting that the deluxe box doesn't, and the best image of all wasn't even taken on the VGA2USB3 itself!

Final word, since I've spent too much money and time on this for the time being: if you know your video source emits 60Hz, then the VGA2USB3 is convenient and works with anything that works with UVC devices, albeit for a significant sticker price. Composite capture is not its strong suit, but it can do both PAL and NTSC which is useful for older systems, and it's handy in a pinch. Plus, it's still working, which is more than I can say for the Video Ghost. On the other hand, if you have a weird old system that doesn't have many compatible video options, it will be little more than a frustrating doorstop, and a pricey one at that. After a little thought we were able to screenshot the apparently unscreenshotable, but with significant compromises in quality, so I'm still in the running for a box that can "just do it" and I guess if I find one it will be a future entry too.

Sunday, April 19, 2020

Inogeni VGA2USB3: screenshots of the unscreenshotable, part II

This is part of a series — you can read prior entries

In our previous entry on screenshots, after the untimely and rapid death of the Video Ghost it was time for another device to try grabbing the "unscreenshotable." After some research, I settled on purchasing an Inogeni VGA2USB3.

The VGA2USB3 is a small, solidly built but fairly pricey unit (mine was about US$260) but has a distinct advantage over the Video Ghost: it's live. In fact, it actually appears to the system as a USB Video Class (UVC) camera, so a huge number of apps on just about every operating system that can run a webcam can view the stream. This was a huge selling point to me personally as my home operating system is ppc64le Linux and I wouldn't need any proprietary drivers. It also has analogue audio and composite (CVBS) inputs, making it potentially a complete system for capturing video instead of just grabs, but it's strictly USB 3.0 due to the bandwidth required (up to 1920x1200 resolution at 60Hz).

Initially, however, the device was horribly flaky with my Raptor Talos II workstation. This turned out to be a power problem because the VGA2USB3 apparently draws a lot (and, being built out of sturdy metal, gets rather warm in use). A USB 3.1 hub with a sidecar power supply enabled it to come up stably and be viewable in VLC, GNOME Cheese and guvcview, which is perfect because you can then just record video or take grabs at any point you want. For this test, I decided to use a couple of my SunRay2 laptops because these hardware clients have no means of taking a picture of the screen to local storage. That's exactly the use case I'm aiming for, so let's try the Accutech Gobi 8 first:

This is the Gobi's startup screen and system menu at its full native resolution through its onboard VGA output (actually, the resulting image from VLC on my Talos II is 1920x1200, but pillarboxed with the right aspect ratio). Again, this is not something you would be able to capture from the Gobi itself. On the VGA2USB3, a red LED on the USB 3.0 side glows when connected to power; another LED on the VGA/CVBS side glows when there is a detected signal.

This is the Gobi showing the SunRay "On-Screen Display" as it connects to my local kOpenRay instance on the same Talos II.

And finally playing remote network Tetpnc as provided by kOpenRay. The mouse cursor (the hourglass) is also captured.

This also works for the more recent Tadpole M1400 SunRay, which I attempted to use with the VideoGhost. The M1400 has a different display aspect ratio than the Gobi, hence the visual differences in the kOpenRay Tetpnc session.

The M1400 has its own unique menu interface, shown here.

It also has a very familiar looking built-in web browser. In fact, this is the only SunRay or SunRay2 device I've ever seen that features one.

I also tested it with macOS (ordinarily I would use my G5 or iBook G4, but the USB 3.0 requirement limits it to my MacBook Air) and connected it to my Apple Network Server 500, to date the physically largest computers Apple ever made and the only ones that ran IBM AIX. Probably because of differences in how VLC accesses the capture device on a Mac, the images came out in 1920x1080 despite being 4:3 1024x768 resolution. They were also somewhat shifted to the right, though this might have been something about the video signal. For these images I cropped to the middle 1440x1080.

Booting AIX 4.1, the Apple Network Server's standard OS, in the graphical (CDE) startup configuration. There's a bit of tearing where the boot log (top right) was updating.

CDE login for AIX 4.1. I miss this old AIX logo.

The shift of the signal to the right is more obvious here (the "Starting up" screen just before getting to the CDE desktop). The right border ended up entirely cut off. Testing this on my Talos II to compare the difference isn't feasible because these systems are in different rooms.

Nevertheless, the device clearly demonstrates basic functionality and appears to work for the purpose advertised. So, with this encouraging first effort in the can, I then decided to try where the VideoGhost had failed and connected it to my SAIC Galaxy 1100 (as previously mentioned, the MIL-SPEC luggable version of the HP PA-RISC "Gecko" 9000/712 workstation). As before: nothing appeared. The VGA2USB3 didn't make the distinct odour one gets when the magic smoke is escaping, but VLC remained as in the dark as a politician during COVID-19. It turns out that there are several other issues going on here and they didn't have anything to do with the Sync-on-Green output. But first I need one more piece of equipment ... to be continued.