Showing posts with label python. Show all posts

Wednesday, February 17, 2010

Why I am going to talk at Pycon ...

I started to develop SPE when I was still using Windows back in 2002. By using Python and wxPython, I hoped SPE would run smoothly on all platforms. That was wishful thinking. Luckily the community stepped in: Linux users started sending me patches and Mac users collected money to buy me a Mac Mini. Many years ago I go I switched to Ubuntu and at that moment I've felt the joy not having chosen a technology which locks you up in one platform.

Later I started developing Phatch (Photo Batch Processor) and used my experience of SPE to polish if for Linux, Mac OS X and Windows. I took care of distributing it well on Linux by getting it in the major repositories (Debian, Ubuntu, Fedora, Arch, Suse, ...). Unfortunately I lacked the time for proper distribution on Mac OS X and Windows. I am happy to announce that is going to change.

Together with Nadia Alramli (other Phatch developer) we've dived deeper in the subject of developing and distributing cross-platform applications. Our conclusion is that is it takes more time to research than to implement the code. Therefore we are eager to share our knowledge during our talk at Pycon to save you from hair-pulling behaviour. We have learnt that Python solves 90% of the cross-platform problems for you, but that the remaining 10% could be tricky. In our talk we will point the finger on several painful issues and offer solutions, hoping that they will save you time and frustration.

We prepared the talk by writing a paper (outline here), which is far more extensive than the 30 min of talk will allow us. We designed the talk to give you a good overview and to get you started. I have send the paper for review to some people I highly respect. These were some reactions:

  • "Great document, I learned new things from it!" Piotr Ożarowski (Debian Python Application Package Team)

  • "It's a pity I can not attend PyCon. Anyway, the subjects you are describing in the paper are seldom analyzed in such depth, and I believe the whole community will benefit from your presentation. Most interesting of all, correctly packaging and distributing an app on multiple platforms can be a deep nightmare and what you have on your paper is a beautiful example of how to avoid the most hair-pulling mistakes in doing it." Andrea Gavana (wxPython)

We will use wxPython as an example GUI toolkit, but the principles are valid for other toolkits as well. Our target audience are programmers who have already some experience on one platform but are wondering how things could be implemented on other platforms. Making your application cross-platform is the most efficient way to scale your user base.

Rather than making any bullet point slides, we did our best to make the slides visually entertaining. So even if our voices would suddenly mute, you have at least something nice to look at. As the author of SPE I made sure that all code slides have a pretty syntax highlight. Combining Pygments with Inkscape rocks!

I hope to see you at our talk at Friday 02:55pm @ Centennial II !

Wednesday, May 20, 2009

sK1 vector graphics editor is now available for Ubuntu


At the last Libre Graphics Meeting I met Igor Novikov, who is the lead developer of sK1. sK1 is a vector graphics editor, just like Inkscape but with a different focus. While Inkscape is oriented to the SVG format and is ideal for web design, sK1 targets professional designers from the prepress world. So sK1 supports CMYK, multiple pages and separating colour plates. To quote wikipedia:
sK1 is an open-source illustration program for the Linux platform that can substitute professional proprietary software like CorelDRAW or Adobe Illustrator. Unique project features are CorelDRAW formats importers, tabbed multidocument interface, Cairo-based engine, color management etc.

The multipage feature is very handy for designing booklets with vector graphics or presentations, which you could project with impressive (former keyjnote). Under the hood Inkscape and sK1 share Uniconvertor, for importing, exporting and converting vector graphics. Uniconvertor was developed by the sK1 team. (sK1 is a fork of the Skencil project.) Another difference from Inkscape, is that sK1 itself is developed mostly in python. So you could in a way it use as a python library.

sK1 is being developed under Mandriva and it is hard to install on Ubuntu (especially for graphic designers). I noticed that Vladimir Osintsev was preparing a package for Ubuntu. I contacted him and invited him to work together on it within the Debian Python Package Team. So hopefully sK1 will become available in Debian and Ubuntu (from Karmic).

As some of you can't wait and like to use sK1 with the current Ubuntu releases, I decided to add sK1 for Jaunty and Intrepid to my PPA:
deb http://ppa.launchpad.net/stani/ppa/ubuntu jaunty main

To add the key of my PPA to your system, type the following in a terminal (replace jaunty with your ubuntu version):
sudo apt-key adv --recv-keys --keyserver keyserver.ubuntu.com 7B0FB2CA

You can read my PPA page https://launchpad.net/~stani/+archive/ppa for more information.

Disclaimer: this is the development version of sK1 and the packages have not been tested by a critical mass. In case you have problems, you should report them on the sK1 forums. The packaging is not perfect yet. For example there will be no entry in the start menu. This will be fixed in a next release. I've sent Igor from sK1 the necessary files to resolve this issue. So for now start sK1 by typing "sk1" in the run dialog (Alt+F2) or in a terminal.

As a final remark: you need to remove your ~/.sk1 folder, otherwise sK1 might have troubles starting up.

Monday, April 6, 2009

DWG support for Blender

I'm working on AR, a python library for Blender, which might be interesting for ARchitects. It targets primarily Blender python scripters, not Blender end users. However non pythoneers might be interested in the library as well, as some side products are end user friendly.

One of the features I have been working on is DWG support for Blender. It uses the DXF scripts of Blender under the hood, so it is limited to their abilities. Probably export will work better than import.


The supported DWG versions are: 9, 10, 12, 13, 14, 2000, 2004 and 2007. (It can also export to the equivalent DXF formats.)


In case you want to use this plugin for Blender, you need to install my ar package first. It has been tested both on Linux and Windows. (Mac Os X might work as well.) Afterwards read the tutorial for further instructions. You can use my DWG conversion python module also outside Blender.

Are you an architect and coding with Python in Blender? I'd love to hear from you, not just because of this blog post. Just send me an email: spe.stani.be # gmail.com

Tuesday, March 31, 2009

Resumable IPython inside Blender Terminal

Would it not be nice if IPython could run inside the Blender terminal in such way that it will remember the namespace history in between sessions? Why IPython? It gives you auto completion, deep reloads, object introspection, input history, access to your operating system commands with python variables, auto indent, ... In case you are not convinced, read this tutorial, reference or watch these screencasts on showmedo.

Most Linux distributions ship IPython in their repositories. For example installing on Ubuntu is as easy as:
$ sudo apt-get install ipython
Getting IPython on Windows or Mac is simple if you have setuptools installed:
$ easy_install IPython
Windows users should install pyreadline as well for autocompletion. Check first in a terminal if IPython is correctly installed:
$ ipython
Python 2.5.2 (r252:60911, Oct 5 2008, 19:24:49)
Type "copyright", "credits" or "license" for more information.

IPython 0.8.4 -- An enhanced Interactive Python.
? -> Introduction and overview of IPython's features.
%quickref -> Quick reference.
help -> Python's own help system.
object? -> Details about 'object'. ?object also works, ?? prints more.

In [1]:
Save the following code as 'ipython_terminal.py' in your blender home script folder (~/.blender/scripts).
#!BPY

"""
Name: 'IPython (Terminal) - Enhanced Interactive Python Shell in Terminal'
Blender: 248
Group: 'System'
Tooltip: 'Interactive Python Console in terminal'
"""

__author__ = "Stani (SPE Python IDE)"
__url__ = ["pythonide.stani.be", "www.blender.org", "www.python.org"]
__bpydoc__ = """\
This only works if you started Blender from a terminal.
Otherwise Blender will freeze. The IPython console will
appear in the terminal. The namespace will be persistent
between console sessions within one Blender session.

Press Ctrl-D to pause the IPython session and return to Blender.
"""

# -*- coding: UTF-8 -*-

# ar - ARchitecture library
# Copyright (C) 2009 www.stani.be
#
# This program is free software: you can redistribute it and/or modify
# it under the terms of the GNU General Public License as published by
# the Free Software Foundation, either version 3 of the License, or
# (at your option) any later version.
#
# This program is distributed in the hope that it will be useful,
# but WITHOUT ANY WARRANTY; without even the implied warranty of
# MERCHANTABILITY or FITNESS FOR A PARTICULAR PURPOSE. See the
# GNU General Public License for more details.
#
# You should have received a copy of the GNU General Public License
# along with this program. If not, see http://www.gnu.org/licenses/

import sys

from IPython.Shell import IPShell

import bpy
import Blender

try:
shell = Blender.Registry.GetKey('ipython.terminal')['shell']
shell.IP.exit_now = False # resume
except TypeError:
sys_argv = sys.argv
sys.argv = ['/usr/bin/ipython']
shell = IPShell(user_ns={'Blender':Blender, 'bpy':bpy})
sys.argv = sys_argv
def pre_prompt_hook(ip, Blender=Blender, shell=shell):
Blender.Redraw()
Blender.Registry.SetKey('ipython.terminal', {'shell':shell})
shell.IP.set_hook('pre_prompt_hook',pre_prompt_hook)

shell.mainloop(banner=shell.IP.BANNER + shell.IP.banner2 +\
'\nPress Ctrl-D to pause the IPython session and ' +\
'return to Blender.\n')

Make sure you start Blender from a terminal and not from the start menu, as IPython will run in the terminal. You can start the IPython terminal from the Script window in Blender. (Scripts > System > Ipython (Terminal) ) Just like in my previous blog post, each time a Python statement is entered, the Blender window is updated. So you can move a cube and see the result, if you type:
In [1]: cube = bpy.data.objects['Cube']

In [2]: cube.LocX = -1
When you want to return to Blender, press Ctrl-D. If you restart later the IPython terminal, it will remember any commands you have typed or any variables you have declared (like cube in the example).

IPython has a different prompt which makes it easy to go back to previous input statements or output values:
In [1]: a=1

In [2]: print a
1

In [3]: a
Out[3]: 1

In [4]: exec _i2 # execute second command
1

In [5]: exec In[2:4] # execute multiple previous commands
1

In [6]: b=_3 # third ouput value

In [7]: a==b
Out[7]: True
If you prefer a standard python prompt (>>>), just enter '%doctest_mode':
In [1]: %doctest_mode
*** Pasting of code with ">>>" or "..." has been enabled.
Exception reporting mode: Plain
Doctest mode is: ON

>>>
For auto completion, press the TAB key:
In [1]: bpy.data.
bpy.data.__class__ bpy.data.curves
bpy.data.__delattr__ bpy.data.fonts
bpy.data.__dict__ bpy.data.groups
bpy.data.__doc__ bpy.data.images
bpy.data.__getattribute__ bpy.data.ipos
bpy.data.__hash__ bpy.data.lamps
bpy.data.__init__ bpy.data.lattices
bpy.data.__name__ bpy.data.materials
bpy.data.__new__ bpy.data.meshes
bpy.data.__reduce__ bpy.data.metaballs
bpy.data.__reduce_ex__ bpy.data.objects
bpy.data.__repr__ bpy.data.scenes
bpy.data.__setattr__ bpy.data.sounds
bpy.data.__str__ bpy.data.texts
bpy.data.actions bpy.data.textures
bpy.data.armatures bpy.data.worlds
bpy.data.cameras

In [1]: bpy.data.m
bpy.data.materials bpy.data.meshes bpy.data.metaballs

In [1]: from Blender import M
Material Mathutils Mesh Metaball Modifier
As shown in the last example auto completion works even for import statements.

Altough the Blender window updates itself, the Blender user interface is still irresponsive when running an IPython session. In a future blog post I'll show how to run IPython inside the Blender window in such way that the user interface stays fully responsive.

Friday, March 27, 2009

Free software python coin on national French television

A while ago I blogged about my winning coin design. As an architect and artist I have switched some years ago to free software. A lot of so called experts would tell me that is impossible. They need Photoshop, Illustrator, Maya, ... on a fancy Macbook. However if I look to what they produce, I see no problem in making that with Gimp, Inkscape, Blender, ... even on an underpowered netbook. I did mainly this blogpost to proof not only that they are wrong, but also to showcase a design, which they even wouldn't be able to make with any proprietary software.

The reactions were overwhelming both from the free software world and outside. The Dutch architecture site did a competition for who could read all the names of the architects. I've been told the design featured in a popular Dutch comic Fokke & Sukke. (Anyone has a reference to this?) Rem Koolhaas was happy he was number one. Also typography sites showed a lot of interest. The Ministry of Finance promoted the coin on national Dutch television with this clip. (Unfortunately I was not involved in the production of the clip, otherwise it would have been 'Blendered'.) The more this kind of success stories pop up, the more people will be convinced to switch to free software.

Last month a French television crew of Avenue de l'Europe (FR3) came to interview me about the coin. They are making a documentary about the 10 years existence of the euro. They chose my design as one of the most remarkable in the history of the euro. As the documentary is about the total history of the euro, I will probably get not more than one minute or maybe just some seconds. The emission is tomorrow 28/3 at 18h30 at FR3: http://info.france3.fr/avenue-europe

In the preparation emails for the interview, I felt they were more interested in the design than in free software. So in order to give some publicity, I wore an Ubuntu T-shirt for the interview. As a location I chose the Fablab in Amsterdam. (They are still looking for people experienced with (graphical) free software or writing 3d printer drivers. If you want to help out, contact alex*waag.org). I guess the television crew really have never heard about free software design, because one of them asked me if I went for holiday in South Africa recently when she saw my Ubuntu T-shirt.

Monday, March 23, 2009

Standard Python Console inside Blender

Blender did not provide an interactive shell by default in the past. This changed a bit with the Interactive Python Console of Campbell Barton (aka ideasman42), which is accessible from the script window (Scripts > System > Interactive Python Console). Unfortunately this console does not support copy&paste, word wrapping, prompts, ...

I wrote a quick script in case you want to interact with Blender from a real Python console. Save it in your Blender home scripts folder (~/.Blender/scripts) as "terminal.py".
#!BPY

"""
Name: 'Terminal - Interactive Python Console in terminal'
Blender: 248
Group: 'System'
Tooltip: 'Interactive Python Console in terminal'
"""

__author__ = "Stani (SPE Python IDE)"
__url__ = ["pythonide.stani.be", "www.blender.org", "www.python.org"]
__bpydoc__ = """\
This only works if you started Blender from a terminal.
Otherwise Blender will freeze. The Python console will
appear in the terminal. The namespace will be persistent
between console sessions within one Blender session.

Press Ctrl-D to quit.
"""

# -*- coding: UTF-8 -*-

# ar - ARchitecture library
# Copyright (C) 2009 www.stani.be
#
# This program is free software: you can redistribute it and/or modify
# it under the terms of the GNU General Public License as published by
# the Free Software Foundation, either version 3 of the License, or
# (at your option) any later version.
#
# This program is distributed in the hope that it will be useful,
# but WITHOUT ANY WARRANTY; without even the implied warranty of
# MERCHANTABILITY or FITNESS FOR A PARTICULAR PURPOSE. See the
# GNU General Public License for more details.
#
# You should have received a copy of the GNU General Public License
# along with this program. If not, see http://www.gnu.org/licenses/

import code, sys
import Blender, bpy

class InteractiveConsole(code.InteractiveConsole):
def interact(self, banner=None):
try:
sys.ps1
except AttributeError:
sys.ps1 = ">>> "
try:
sys.ps2
except AttributeError:
sys.ps2 = "... "
cprt = 'Type "help", "copyright", "credits" or "license"'+\
' for more information.'
if banner is None:
self.write("Python %s on %s\n%s\n(%s)\n" %
(sys.version, sys.platform, cprt,
self.__class__.__name__))
else:
self.write("%s\n" % str(banner))
self.write('Press Ctrl-D to quit.\n')
more = 0
while 1:
try:
if more:
prompt = sys.ps2
else:
prompt = sys.ps1
try:
line = self.raw_input(prompt)
except EOFError:
self.write("\n")
break
else:
more = self.push(line)
except KeyboardInterrupt:
self.write("\nKeyboardInterrupt\n")
self.resetbuffer()
more = 0
Blender.Redraw()
Blender.Registry.SetKey('terminal.locals', self.locals)

locals = Blender.Registry.GetKey('terminal.locals')
if not locals:
locals = {'Blender':Blender, 'bpy':bpy}
console = InteractiveConsole(locals=locals)
console.interact()
To use it, you need to start Blender from a terminal (with compiz turned off):
$ blender -w
This is very important, otherwise Blender will be blocked waiting for input at an invisible terminal. The terminal console can be started from the script window: Scripts > System > Terminal. The modules 'Blender' and 'bpy' are preloaded into the console, so you don't need to import them manually. Each time a Python statement is entered, the Blender window is updated. So you can move a cube and see the result, if you type:
>>> cube = bpy.data.objects['Cube']
>>> cube.LocX = -1
You can quit the interactive console by pressing Ctrl-D. You can restart the terminal as many times as you wish and automagically all your local variables will be kept (such as 'cube' in the example).

The disadvantage is that the Blender window itself becomes unresponsive. For example you can not rotate the view during a Python console session. Also it would be much nicer to use IPython instead of the standard Python shell. However in a future blog post I'll have good news, if you want IPython integration inside Blender.

Wednesday, October 29, 2008

How to make money with free software...

For a dutch text click here.

Introduction
The Dutch Ministry of Finance organized an architecture competition for which a selected group of architectural offices (unstudio, nox, ...) and artists were invited, including myself. The goal of the competition was not to design a building, but the new 5 euro commemorative coin with the theme 'Netherlands and Architecture'. The winner will be rewarded with a nice price, but most of all with the honor: his design will be realized and will be a legal coin within the Netherlands.

I approached the subject 'Netherlands and Architecture' from two points of view. On one hand I paid tribute to the rich Dutch architecture history and on the other hand to the contemporary quality of Dutch architecture. These form also the two sides of my coin. Traditionally the front of the coin needs to portray the queen, while the back side displays the value of the coin.

Front side

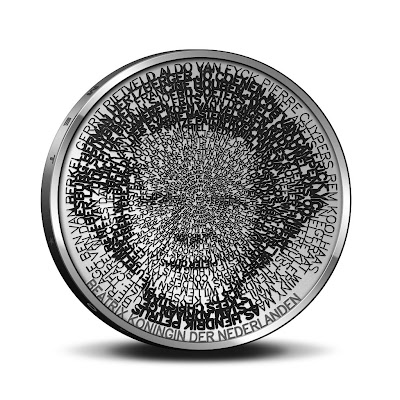
When someone looks closely (click above on picture to enlarge) to my portrait of the queen, it becomes clear that her portrait is constructed with names of important Dutch architects. On the outside the names are clearly readable, while they slowly get smaller to the center. Under a magnifying glass all names are readable, but not with only the human eye. It is fascinating to see how an old medium like a coin can be in this way a 'compact disc' of information.

The tension between what is readable and what not, is also a metaphor how time shapes history. Some big names of the past, might be smaller names in the future and vice versa. To reflect this idea, I chose to order the architects not alphabetically or chronologically but in a new way: I used the internet as a seismograph and ordered the architects by the number of hits on the internet.


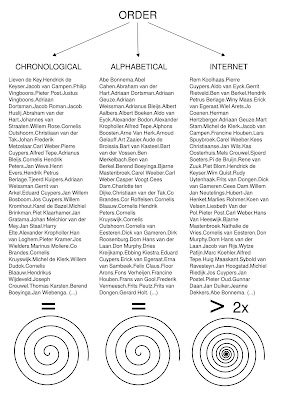
Of course this order changes over time and as such this is another time stamp on the coin besides the number '2008'. Only the first 109 architects fitted on the coin, so that was immediately the selection. Apparently becoming famous goes exponentially:


In order to achieve the image I developed my own single-line font system. I let the line width change within the same character in order to evoke an underlying picture:
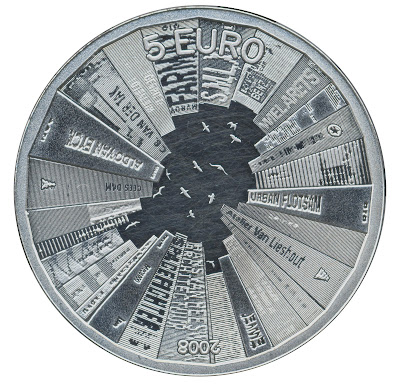

Back side


Nowadays Dutch architecture is famous for its strong conceptual approach. This translates itself in the fact that there are not only a lot of books about Dutch architects, but also by Dutch architects.


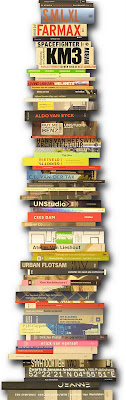
On the back side of the coin I treated the edge of the coin as a book shelve. The books rise as buildings towards the center. Through their careful placement they combine to outline the Netherlands, while birds’ silhouettes suggest the capitals of all the provinces. The following scheme reveals the process:


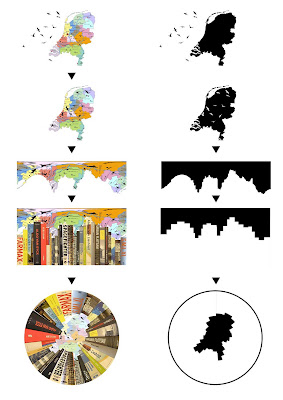
One of the issues was how many books to take: many thin books or fewer thick books. With one very thick book you would only get a circle. To get the best approximation of the Netherlands you would need books of only one page, which is not optimal either. Therefore I needed to find the optimum between these two extremes which you can see in the scheme below. On the left you see the approximation of the Netherlands, in the middle you see the 'skyline' of the books and on the right you see the difference between the 'skyline' of the books and of the border line of the Netherlands:


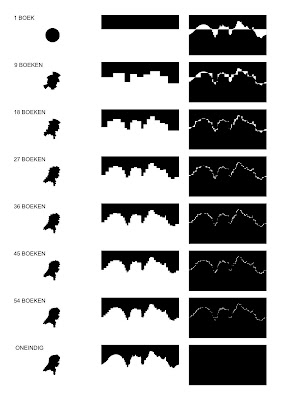
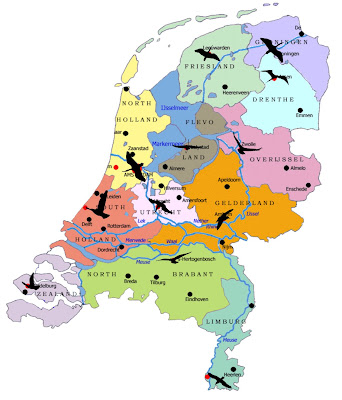
The following is the idea sketch for the birds. Each bird flies above the capital of each Dutch province. In the final coin these random birds are replaced with a bird which is typical for that province.


Technology
The whole design was done for 100% with free software. The biggest part consists of custom software in Python, of course within the SPE editor. For the visual power I used PIL and pyCairo. From time to time also Gimp, Inkscape and Phatch helped quite a bit. All the developing and processing was done on GNU/Linux machines which were running Ubuntu/Debian. In the end I had to collaborate closely on location together with the technicians of the Royal Dutch Mint (coin factory). So all the last bits were done on my Asus Eee PC. (I am still wondering why Asus doesn't offer Ubuntu on its netbooks.) The Eee laptop took a bit longer (30 seconds instead of 3 seconds to generate a whole coin), but did the job just fine. For looking up the number of hits on the internet, I rediscovered Yahoo, which provides a much better api for automatic querying than its competitors. Of course the jury judged only the design and not the software used as others used Maya, Illustrator, ...

And the winner is...
I am proud to announce that I won the competition! So soon 350.000 Dutch people will use the fruits of free software. I would have loved to release the coin under the GPL, which could maybe solve the financial crisis. However for obvious reasons I was not allowed to do that. There will be also special editions for collectors which can be bought world wide: a massive silver edition for € 30,95 and a massive gold edition for € 194,95. They will be probably sold out quickly as these are real collectors items. The coin is released in all Dutch post offices to the public the same day as the Intrepid Ibex: 30th October 2008.

Here are some scans of the real coin:


The coin will be advertised 20 times on prime time on Dutch television with a nice video clip (will be available soon) and advertisements will run in several newspapers. Today was the official launch of the coin, with from left to right: myself, Secretary of State for Finance De Jager, the Chief government Architect Liesbeth van der Pol and Master of the Mint Maarten Brouwer...

Liesbeth van der Pol toont het eerste Architectuur Vijfje (Bron foto: Githa van Eeuwen Fotografie)

Monday, March 31, 2008

How to write a wxPython video player with Gstreamer

wxPython ships by default with the wx.MediaCtrl for very basic playback of music or videos. As I would like to do more advanced video manipulation, I was curious if I could use Gstreamer directly in wxPython to create my own pipelines. It was surprisingly easy.
For those who don't know Gstreamer, I quote the website (http://www.gstreamer.org):
GStreamer is a library that allows the construction of graphs of media-handling components, ranging from simple playback to complex audio (mixing) and video (non-linear editing) processing. Applications can take advantage of advances in codec and filter technology transparently.


There are python bindings for it, of which the documentation can be found on http://pygstdocs.berlios.de
I would also suggest to read these introductions to gstreamer & python:

I translated the video player example 2.2 of the tutorial from pyGtk to wxPython:
http://pygstdocs.berlios.de/pygst-tutorial/playbin.html

It should be straightforward to use this as a base for implementing your own pipelines. I work on Ubuntu, where I could install everything straight from the standard repositories.

Here is the source code:
#!/usr/bin/env python
#Example 2.2 http://pygstdocs.berlios.de/pygst-tutorial/playbin.html

import sys, os
import wx
import pygst
pygst.require("0.10")
import gst

import gobject
gobject.threads_init()

class WX_Main(wx.App):

def OnInit(self):
window = wx.Frame(None)
window.SetTitle("Video-Player")
window.SetSize((500, 400))
window.Bind(wx.EVT_CLOSE,self.destroy)
vbox = wx.BoxSizer(wx.VERTICAL)
hbox = wx.BoxSizer(wx.HORIZONTAL)
self.entry = wx.TextCtrl(window)
hbox.Add(self.entry, 1, wx.ALL|wx.ALIGN_CENTER_VERTICAL, 4)
self.button = wx.Button(window,label="Start")
hbox.Add(self.button, 0, wx.ALL|wx.ALIGN_CENTER_VERTICAL, 4)
self.button.Bind(wx.EVT_BUTTON, self.start_stop)
vbox.Add(hbox, 0, wx.EXPAND, 0)
self.movie_window = wx.Panel(window)
vbox.Add(self.movie_window,1,wx.ALL|wx.EXPAND,4)
window.SetSizer(vbox)
window.Layout()
window.Show()
self.SetTopWindow(window)

self.player = gst.element_factory_make("playbin", "player")
bus = self.player.get_bus()
bus.add_signal_watch()
bus.enable_sync_message_emission()
bus.connect('message', self.on_message)
bus.connect('sync-message::element', self.on_sync_message)

return True

def start_stop(self, event):
if self.button.GetLabel() == "Start":
filepath = self.entry.GetValue()
if os.path.exists(filepath):
self.button.SetLabel("Stop")
self.player.set_property('uri',"file://" + filepath)
self.player.set_state(gst.STATE_PLAYING)
else:
self.player.set_state(gst.STATE_NULL)
self.button.SetLabel("Start")

def on_message(self, bus, message):
t = message.type
if t == gst.MESSAGE_EOS:
self.player.set_state(gst.STATE_NULL)
self.button.SetLabel("Start")
elif t == gst.MESSAGE_ERROR:
self.player.set_state(gst.STATE_NULL)
self.button.SetLabel("Start")

def on_sync_message(self, bus, message):
if message.structure is None:
return
message_name = message.structure.get_name()
if message_name == 'prepare-xwindow-id':
imagesink = message.src
imagesink.set_property('force-aspect-ratio', True)
imagesink.set_xwindow_id(self.movie_window.GetHandle())

def destroy(self,event):
#Stop the player pipeline to prevent a X Window System error
self.player.set_state(gst.STATE_NULL)
event.Skip()

app = WX_Main()
app.MainLoop()

Tuesday, March 25, 2008

SPE packaged for Mac OS X

Krzysztof Olczyk did a wonderful job by packaging SPE for Mac OS X. You can download it here:
http://olczyk.krzysztof.googlepages.com/SPE.dmg

He commented:
You can install now SPE in your Macintosh in a way you do with native applcation.
Simply mount the DMG and drag the SPE to Applications folder.

Another advantage is, that now SPE will have its own icon in dock, like any application in Mac.

Have fun.

I will release soon SPE 0.8.4.e with some important bug fixes and I hope Krzysztof Olczyk will update the package for the Mac.

Please test the package and let Krystof know how it works.

Thanks Krystof!
Stani

Thursday, February 14, 2008

SPE 0.8.4.c Python IDE editor released

As SPE was being developed for more than a year in subversion, I thought it is time for a release again. This is a major bugfix release. It ships updated plugins and also some new features, especially if you use Linux or Blender, for which Witold did a great job. Thanks to the big help of MOTU pochu, this is added to Ubuntu Hardy. I would also like to thank in particular the webhost Zindep.com for their support and patience.

New features:
  • new versions of WinPdb debugger, PyChecker, wxGlade & XRCed gui designer
  • clear output pane
  • support for wxPython 2.8
  • linux support for nautilus, gnome-terminal, konqueror, konsole, thunar
  • improved blender support up to 2.45 (by Witold)
Fixes:
  • sidebar sash more tolerant
  • show path in title (linux)
  • run with filename with spaces
  • nicer debug dialog box
  • kill process fix
  • notebook
  • insert signature
  • numpad keys (by isolationism)
  • find tab with nonexisting files
  • add environment to SPE.py (linux)
  • better warning for documentation for unsaved files
  • better handling of new empty files
  • many more...
Installing on Debian(unstable) and Ubuntu Hardy:
sudo apt-get install spe
Installing on all other platforms:
  1. Download either the zip or tar ball from here
  2. Unzip it where you want and do NOT rename the _spe folder
  3. Start SPE from within the _spe folder with "python SPE.py"

Wednesday, February 6, 2008

Howto install sK1, a powerful alternative for Illustrator on Ubuntu

This post is deprecated as sk1 now has an official ubuntu installer:
http://sk1project.org/modules.php?na...ts&product=sk1

So this is for archival purposes only:

Igor, the icon king of Phatch, asked me if I could get sk1 to work on Ubuntu Gutsy. After playing around I found a way. Try this on your own risk.

I never heard about sk1 and looked it up on the website:
http://sk1project.org/

Why sk1project?

We think that sK1 is a powerful illustration program for the Linux platform that can substitute professional proprietary software like CorelDRAW or Adobe Illustrator and we hope the program and its derivatives will be helpful for you.

About sK1 vector graphics editor

sK1 is an open source vector graphics editor similar to CorelDRAW, Adobe Illustrator, or Freehand.
First of all sK1 is oriented for PostScript processing.
The major sK1 features:

* CMYK colorspace support
* CMYK support in Postscript
* Cairo-based engine
* Color managment
* Universal CDR importer (7-X3 versions)
* Modern Ttk based (former Tile widgets) user interface
It looks quite impressive and in five steps you can have it up and running on your Ubuntu Gutsy. It is a KDE application.

1) Installing required modules
Type this at a terminal:
sudo apt-get install liblcms-utils python-liblcms python-imaging-tk kdebase-bin
2) Installing tcl/tk8.5
Download the tk8.5 and tcl8.5 packages of Gustavo A. Díaz for the amsn project:
http://download.tuxfamily.org/amsnskins/packages/ubuntu/tcl-tk/

Open and install these files in this order with gdebi:
tcl8.5_8.5.0-2_i386.deb
tk8.5_8.5.0-2_i386.deb

3) Installing sk1
Now download the latest version of sk1 from:
http://sk1project.org/modules.php?name=Products&product=sk1

And convert it to a debian installer:
sudo alien sK1-0.9.0-rev324-0.mdv2008.i586.rpm
4) Patching sk1
We need to patch this file:
sudo gedit /usr/lib/python2.5/site-packages/sk1/app/managers/colormanager.py

Replace there on line 9:
from lcms import (...)
into
from lcms.lcms import (...)
5) Start sk1
Press Alt+F2 and type "sk1" at the terminal and sk1 is up and running! You can create a menu entry with alacarta or a desktop launcher with the command "sk1". I have not tested how well it works.

This is a screenshot, turned into perspective with Phatch:

Wednesday, January 16, 2008

Latest wxGlade, XRCed and Winpdb in subversion

So SPE is up to date again. The Winpdb debugger now features autocompletion. It is looking for a new name, as most people associate win with Windows (while winpdb is being developed on ubuntu now). The new XRCed (gui designer for wxpython) looks really slick. This is a screenshot on ubuntu:

Wednesday, October 31, 2007

How to install pymedia on Ubuntu (Gutsy)

"Pymedia is a Python library for accessing and manipulating media files. It makes audio and video playback/creation a snap for even a newcomer to programming." There is a deb installer available for pymedia 1.3.5 but not for 1.3.7 So I decided to write this howto.

First install all the dependencies:
sudo apt-get install python-dev libogg-dev libvorbis-dev liblame-dev libfaad2-dev libasound2-dev python-pygame
(Pygame is not really necessary, but recommended.)

Extract a download of pymedia-*.tgz and open a terminal in the extracted folder, so we can build pymedia:
python setup.py build

This should display:
Using UNIX configuration...

OGG : found
VORBIS : found
FAAD : found
MP3LAME : found
VORBISENC : found
ALSA : found
Continue building pymedia ? [Y,n]:

If everything is found press Y

Finally install pymedia:
sudo python setup.py install


Test if pymedia installed correctly by typing this at the python shell:
import pymedia


You may now proceed to the pymedia tutorials.

Monday, March 5, 2007

Pyxides brainstorm: generic 'fold explorer'

I posted on the pyxides mailing list a prototype of a 'fold explorer'. A fold explorer is different from a class explorer as it shows the folding hierarchy of a document as a tree. Why? The aim is to use the internal power of Scintilla as much as possible. Scintilla supports 78 languages and a lot of them with folding. So the fold explorer enables any scintilla based editor to immediately support a whole range of languages. The fold explorer is also able to detect the start and end line of a node. If you right click any item in the tree, it will select the corresponding source. So later it should be possible with drag and drop items in a tree to reorganise your code. (Like in Leo, but without comments.) Now it uses 'picasso', a random style colorizer. For more information read the this thread on the pyxides mailing list. (Join the mailing list!)

Does anyone know how with python I could dynamically retrieve if a language support folding? That is the last missing piece.

This screenshot shows how it parses its own python source:


Rob McMullen shows how it parses a C++ file:


Here is the source code if you want to try it out for yourself. You need to have wxPython installed to run it. It is a nice demo if you want to play around with scintilla on python. I am open to any improvements, remarks or feedback.
#!usr/bin/python              
# -*- coding: utf8 -*-
#(c)www.stani.be, GPL licensed

import sys, random
import wx
import wx.stc as stc

DEFAULT_ENCODING= 'utf8'
STC_LANGUAGES = [x[8:] for x in dir(stc) if x.startswith('STC_LEX_')]
WHITE = 6777215
GRAY = 3388607

def value2colour(c):
return ('#%6s'%hex(c)[2:]).replace(' ','0').upper()

def picasso():
c = random.randint(0,GRAY)
return value2colour(c), value2colour((c+GRAY)%WHITE)

class Node:
def __init__(self,level,start,end,text,parent=None,styles=[]):
"""Folding node as data for tree item."""
self.parent = parent
self.level = level
self.start = start
self.end = end
self.text = text
self.styles = styles #can be useful for icon detection
self.children = []


class Editor(stc.StyledTextCtrl):
#---initialize
def __init__(self,parent,language='UNKNOWN'):
stc.StyledTextCtrl.__init__(self,parent,-1)
self.setFoldMargin()
self.encoding = DEFAULT_ENCODING

def setFoldMargin(self):
self.SetProperty("fold", "1")
self.SetProperty("fold.html","1")
#MARGINS
self.SetMargins(0,0)
#margin 1 for line numbers
self.SetMarginType(1, stc.STC_MARGIN_NUMBER)
self.SetMarginWidth(1, 50)
#margin 2 for markers
self.SetMarginType(2, stc.STC_MARGIN_SYMBOL)
self.SetMarginMask(2, stc.STC_MASK_FOLDERS)
self.SetMarginSensitive(2, True)
self.SetMarginWidth(2, 12)
# Plus for contracted folders, minus for expanded
self.MarkerDefine(stc.STC_MARKNUM_FOLDEROPEN, stc.STC_MARK_MINUS, "white", "black")
self.MarkerDefine(stc.STC_MARKNUM_FOLDER, stc.STC_MARK_PLUS, "white", "black")
self.MarkerDefine(stc.STC_MARKNUM_FOLDERSUB, stc.STC_MARK_EMPTY, "white", "black")
self.MarkerDefine(stc.STC_MARKNUM_FOLDERTAIL, stc.STC_MARK_EMPTY, "white", "black")
self.MarkerDefine(stc.STC_MARKNUM_FOLDEREND, stc.STC_MARK_EMPTY, "white", "black")
self.MarkerDefine(stc.STC_MARKNUM_FOLDEROPENMID, stc.STC_MARK_EMPTY, "white", "black")
self.MarkerDefine(stc.STC_MARKNUM_FOLDERMIDTAIL, stc.STC_MARK_EMPTY, "white", "black")
self.Bind(stc.EVT_STC_MARGINCLICK, self.onMarginClick)

def onMarginClick(self, evt):
# fold and unfold as needed
if evt.GetMargin() == 2:
if evt.GetShift() and evt.GetControl():
self.FoldAll()
else:
lineClicked = self.LineFromPosition(evt.GetPosition())
if self.GetFoldLevel(lineClicked)&stc.STC_FOLDLEVELHEADERFLAG:
if evt.GetShift():
self.SetFoldExpanded(lineClicked, True)
self.Expand(lineClicked, True, True, 1)
elif evt.GetControl():
if self.GetFoldExpanded(lineClicked):
self.SetFoldExpanded(lineClicked, False)
self.Expand(lineClicked, False, True, 0)
else:
self.SetFoldExpanded(lineClicked, True)
self.Expand(lineClicked, True, True, 100)
else:
self.ToggleFold(lineClicked)

#---open
def open(self,fileName, language, encoding=DEFAULT_ENCODING, line=0):
self.setLanguage(language)
self.setText(open(fileName).read(),encoding)
wx.CallAfter(self.GotoLine,line)

def setText(self,text,encoding=DEFAULT_ENCODING):
self.encoding = encoding
self.SetText(text.decode(encoding))
self.Colourise(0, self.GetTextLength()) #make sure everything is lexed
wx.CallAfter(self.explorer.update)

def setLanguage(self,language):
if language in STC_LANGUAGES:
self.SetLexer(getattr(stc,'STC_LEX_%s'%language))
for style in range(50):
self.StyleSetSpec(style,"fore:%s,back:%s"%picasso())
return True
return False

#---hierarchy
def getHierarchy(self):
#[(level,line,text,parent,[children]),]
n = self.GetLineCount()+1
prevNode = root = Node(level=0,start=0,end=n,text='root',parent=None)
for line in range(n-1):
foldBits = self.GetFoldLevel(line)
if foldBits&stc.STC_FOLDLEVELHEADERFLAG:
#folding point
prevLevel = prevNode.level
level = foldBits&stc.STC_FOLDLEVELNUMBERMASK
text = self.GetLine(line)
node = Node(level=level,start=line,end=n,text=text)
if level == prevLevel:
#say hello to new brother or sister
node.parent = prevNode.parent
node.parent.children.append(node)
prevNode.end= line
elif level>prevLevel:
#give birth to child (only one level deep)
node.parent = prevNode
prevNode.children.append(node)
else:
#find your uncles and aunts (can be several levels up)
while level < prevNode.level:
prevNode.end = line
prevNode = prevNode.parent
node.parent = prevNode.parent
node.parent.children.append(node)
prevNode.end= line
prevNode = node
prevNode.end = line
return root

def selectNode(self,node):
"""If a tree item is right clicked select the corresponding code"""
self.GotoLine(node.start)
self.SetSelection(
self.PositionFromLine(node.start),
self.PositionFromLine(node.end),
)

class TreeCtrl(wx.TreeCtrl):
def __init__(self,*args,**keyw):
keyw['style'] = wx.TR_HIDE_ROOT|wx.TR_HAS_BUTTONS
wx.TreeCtrl.__init__(self,*args,**keyw)
self.root = self.AddRoot('foldExplorer root')
self.hierarchy = None
self.Bind(wx.EVT_RIGHT_UP, self.onRightUp)
self.Bind(wx.EVT_TREE_KEY_DOWN, self.update)

def update(self, event=None):
"""Update tree with the source code of the editor"""
hierarchy = self.editor.getHierarchy()
if hierarchy != self.hierarchy:
self.hierarchy = hierarchy
self.DeleteChildren(self.root)
self.appendChildren(self.root,self.hierarchy)

def appendChildren(self,wxParent,nodeParent):
for nodeItem in nodeParent.children:
wxItem = self.AppendItem(wxParent,nodeItem.text.strip())
self.SetPyData(wxItem,nodeItem)
self.appendChildren(wxItem,nodeItem)

def onRightUp(self,event):
"""If a tree item is right clicked select the corresponding code"""
pt = event.GetPosition();
wxItem, flags = self.HitTest(pt)
nodeItem = self.GetPyData(wxItem)
self.editor.selectNode(nodeItem)

class Frame(wx.Frame):
def __init__(self,title,size=(800,600)):
wx.Frame.__init__(self,None,-1,title,size=size)
splitter = wx.SplitterWindow(self)
self.explorer = TreeCtrl(splitter)
self.editor = Editor(splitter)
splitter.SplitVertically(
self.explorer,
self.editor,
int(self.GetClientSize()[1]/3)
)
self.explorer.editor = self.editor
self.editor.explorer = self.explorer
self.Show()

if __name__ == '__main__':
print 'This scintilla supports %d languages.'%len(STC_LANGUAGES)
print ', '.join(STC_LANGUAGES)
app = wx.PySimpleApp()
frame = Frame("Fold Explorer Demo")

fileName= sys.argv[-1] #choose file
frame.editor.open(fileName,'PYTHON','utf8') #choose language in caps

app.MainLoop()

Sunday, March 4, 2007

How to switch between python2.4 and python2.5 on Ubuntu

The default version of python on Edgy is python2.4 and on Feisty is python2.5 If you installed both versions of python and want to switch between them you have once to type this in a terminal:
sudo update-alternatives --install /usr/bin/python python /usr/bin/python2.4 10
sudo update-alternatives --install /usr/bin/python python /usr/bin/python2.5 1
Afterwards you can choose at any time your standard python version by:
sudo update-alternatives --config python
Filter by topic: spe, python, ubuntu