Showing posts with label howto. Show all posts

Wednesday, May 20, 2009

sK1 vector graphics editor is now available for Ubuntu


At the last Libre Graphics Meeting I met Igor Novikov, who is the lead developer of sK1. sK1 is a vector graphics editor, just like Inkscape but with a different focus. While Inkscape is oriented to the SVG format and is ideal for web design, sK1 targets professional designers from the prepress world. So sK1 supports CMYK, multiple pages and separating colour plates. To quote wikipedia:
sK1 is an open-source illustration program for the Linux platform that can substitute professional proprietary software like CorelDRAW or Adobe Illustrator. Unique project features are CorelDRAW formats importers, tabbed multidocument interface, Cairo-based engine, color management etc.

The multipage feature is very handy for designing booklets with vector graphics or presentations, which you could project with impressive (former keyjnote). Under the hood Inkscape and sK1 share Uniconvertor, for importing, exporting and converting vector graphics. Uniconvertor was developed by the sK1 team. (sK1 is a fork of the Skencil project.) Another difference from Inkscape, is that sK1 itself is developed mostly in python. So you could in a way it use as a python library.

sK1 is being developed under Mandriva and it is hard to install on Ubuntu (especially for graphic designers). I noticed that Vladimir Osintsev was preparing a package for Ubuntu. I contacted him and invited him to work together on it within the Debian Python Package Team. So hopefully sK1 will become available in Debian and Ubuntu (from Karmic).

As some of you can't wait and like to use sK1 with the current Ubuntu releases, I decided to add sK1 for Jaunty and Intrepid to my PPA:
deb http://ppa.launchpad.net/stani/ppa/ubuntu jaunty main

To add the key of my PPA to your system, type the following in a terminal (replace jaunty with your ubuntu version):
sudo apt-key adv --recv-keys --keyserver keyserver.ubuntu.com 7B0FB2CA

You can read my PPA page https://launchpad.net/~stani/+archive/ppa for more information.

Disclaimer: this is the development version of sK1 and the packages have not been tested by a critical mass. In case you have problems, you should report them on the sK1 forums. The packaging is not perfect yet. For example there will be no entry in the start menu. This will be fixed in a next release. I've sent Igor from sK1 the necessary files to resolve this issue. So for now start sK1 by typing "sk1" in the run dialog (Alt+F2) or in a terminal.

As a final remark: you need to remove your ~/.sk1 folder, otherwise sK1 might have troubles starting up.

Monday, April 6, 2009

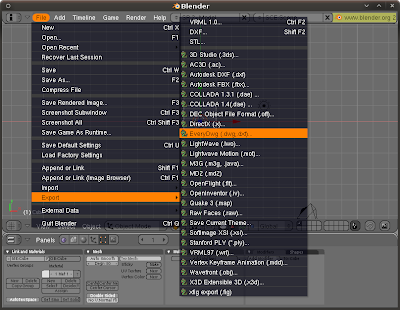
DWG support for Blender

I'm working on AR, a python library for Blender, which might be interesting for ARchitects. It targets primarily Blender python scripters, not Blender end users. However non pythoneers might be interested in the library as well, as some side products are end user friendly.

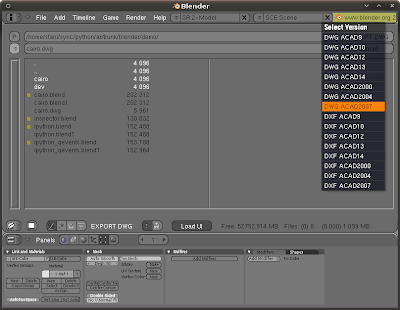
One of the features I have been working on is DWG support for Blender. It uses the DXF scripts of Blender under the hood, so it is limited to their abilities. Probably export will work better than import.


The supported DWG versions are: 9, 10, 12, 13, 14, 2000, 2004 and 2007. (It can also export to the equivalent DXF formats.)


In case you want to use this plugin for Blender, you need to install my ar package first. It has been tested both on Linux and Windows. (Mac Os X might work as well.) Afterwards read the tutorial for further instructions. You can use my DWG conversion python module also outside Blender.

Are you an architect and coding with Python in Blender? I'd love to hear from you, not just because of this blog post. Just send me an email: spe.stani.be # gmail.com

Tuesday, March 31, 2009

Resumable IPython inside Blender Terminal

Would it not be nice if IPython could run inside the Blender terminal in such way that it will remember the namespace history in between sessions? Why IPython? It gives you auto completion, deep reloads, object introspection, input history, access to your operating system commands with python variables, auto indent, ... In case you are not convinced, read this tutorial, reference or watch these screencasts on showmedo.

Most Linux distributions ship IPython in their repositories. For example installing on Ubuntu is as easy as:
$ sudo apt-get install ipython
Getting IPython on Windows or Mac is simple if you have setuptools installed:
$ easy_install IPython
Windows users should install pyreadline as well for autocompletion. Check first in a terminal if IPython is correctly installed:
$ ipython
Python 2.5.2 (r252:60911, Oct 5 2008, 19:24:49)
Type "copyright", "credits" or "license" for more information.

IPython 0.8.4 -- An enhanced Interactive Python.
? -> Introduction and overview of IPython's features.
%quickref -> Quick reference.
help -> Python's own help system.
object? -> Details about 'object'. ?object also works, ?? prints more.

In [1]:
Save the following code as 'ipython_terminal.py' in your blender home script folder (~/.blender/scripts).
#!BPY

"""
Name: 'IPython (Terminal) - Enhanced Interactive Python Shell in Terminal'
Blender: 248
Group: 'System'
Tooltip: 'Interactive Python Console in terminal'
"""

__author__ = "Stani (SPE Python IDE)"
__url__ = ["pythonide.stani.be", "www.blender.org", "www.python.org"]
__bpydoc__ = """\
This only works if you started Blender from a terminal.
Otherwise Blender will freeze. The IPython console will
appear in the terminal. The namespace will be persistent
between console sessions within one Blender session.

Press Ctrl-D to pause the IPython session and return to Blender.
"""

# -*- coding: UTF-8 -*-

# ar - ARchitecture library
# Copyright (C) 2009 www.stani.be
#
# This program is free software: you can redistribute it and/or modify
# it under the terms of the GNU General Public License as published by
# the Free Software Foundation, either version 3 of the License, or
# (at your option) any later version.
#
# This program is distributed in the hope that it will be useful,
# but WITHOUT ANY WARRANTY; without even the implied warranty of
# MERCHANTABILITY or FITNESS FOR A PARTICULAR PURPOSE. See the
# GNU General Public License for more details.
#
# You should have received a copy of the GNU General Public License
# along with this program. If not, see http://www.gnu.org/licenses/

import sys

from IPython.Shell import IPShell

import bpy
import Blender

try:
shell = Blender.Registry.GetKey('ipython.terminal')['shell']
shell.IP.exit_now = False # resume
except TypeError:
sys_argv = sys.argv
sys.argv = ['/usr/bin/ipython']
shell = IPShell(user_ns={'Blender':Blender, 'bpy':bpy})
sys.argv = sys_argv
def pre_prompt_hook(ip, Blender=Blender, shell=shell):
Blender.Redraw()
Blender.Registry.SetKey('ipython.terminal', {'shell':shell})
shell.IP.set_hook('pre_prompt_hook',pre_prompt_hook)

shell.mainloop(banner=shell.IP.BANNER + shell.IP.banner2 +\
'\nPress Ctrl-D to pause the IPython session and ' +\
'return to Blender.\n')

Make sure you start Blender from a terminal and not from the start menu, as IPython will run in the terminal. You can start the IPython terminal from the Script window in Blender. (Scripts > System > Ipython (Terminal) ) Just like in my previous blog post, each time a Python statement is entered, the Blender window is updated. So you can move a cube and see the result, if you type:
In [1]: cube = bpy.data.objects['Cube']

In [2]: cube.LocX = -1
When you want to return to Blender, press Ctrl-D. If you restart later the IPython terminal, it will remember any commands you have typed or any variables you have declared (like cube in the example).

IPython has a different prompt which makes it easy to go back to previous input statements or output values:
In [1]: a=1

In [2]: print a
1

In [3]: a
Out[3]: 1

In [4]: exec _i2 # execute second command
1

In [5]: exec In[2:4] # execute multiple previous commands
1

In [6]: b=_3 # third ouput value

In [7]: a==b
Out[7]: True
If you prefer a standard python prompt (>>>), just enter '%doctest_mode':
In [1]: %doctest_mode
*** Pasting of code with ">>>" or "..." has been enabled.
Exception reporting mode: Plain
Doctest mode is: ON

>>>
For auto completion, press the TAB key:
In [1]: bpy.data.
bpy.data.__class__ bpy.data.curves
bpy.data.__delattr__ bpy.data.fonts
bpy.data.__dict__ bpy.data.groups
bpy.data.__doc__ bpy.data.images
bpy.data.__getattribute__ bpy.data.ipos
bpy.data.__hash__ bpy.data.lamps
bpy.data.__init__ bpy.data.lattices
bpy.data.__name__ bpy.data.materials
bpy.data.__new__ bpy.data.meshes
bpy.data.__reduce__ bpy.data.metaballs
bpy.data.__reduce_ex__ bpy.data.objects
bpy.data.__repr__ bpy.data.scenes
bpy.data.__setattr__ bpy.data.sounds
bpy.data.__str__ bpy.data.texts
bpy.data.actions bpy.data.textures
bpy.data.armatures bpy.data.worlds
bpy.data.cameras

In [1]: bpy.data.m
bpy.data.materials bpy.data.meshes bpy.data.metaballs

In [1]: from Blender import M
Material Mathutils Mesh Metaball Modifier
As shown in the last example auto completion works even for import statements.

Altough the Blender window updates itself, the Blender user interface is still irresponsive when running an IPython session. In a future blog post I'll show how to run IPython inside the Blender window in such way that the user interface stays fully responsive.

Monday, March 23, 2009

Standard Python Console inside Blender

Blender did not provide an interactive shell by default in the past. This changed a bit with the Interactive Python Console of Campbell Barton (aka ideasman42), which is accessible from the script window (Scripts > System > Interactive Python Console). Unfortunately this console does not support copy&paste, word wrapping, prompts, ...

I wrote a quick script in case you want to interact with Blender from a real Python console. Save it in your Blender home scripts folder (~/.Blender/scripts) as "terminal.py".
#!BPY

"""
Name: 'Terminal - Interactive Python Console in terminal'
Blender: 248
Group: 'System'
Tooltip: 'Interactive Python Console in terminal'
"""

__author__ = "Stani (SPE Python IDE)"
__url__ = ["pythonide.stani.be", "www.blender.org", "www.python.org"]
__bpydoc__ = """\
This only works if you started Blender from a terminal.
Otherwise Blender will freeze. The Python console will
appear in the terminal. The namespace will be persistent
between console sessions within one Blender session.

Press Ctrl-D to quit.
"""

# -*- coding: UTF-8 -*-

# ar - ARchitecture library
# Copyright (C) 2009 www.stani.be
#
# This program is free software: you can redistribute it and/or modify
# it under the terms of the GNU General Public License as published by
# the Free Software Foundation, either version 3 of the License, or
# (at your option) any later version.
#
# This program is distributed in the hope that it will be useful,
# but WITHOUT ANY WARRANTY; without even the implied warranty of
# MERCHANTABILITY or FITNESS FOR A PARTICULAR PURPOSE. See the
# GNU General Public License for more details.
#
# You should have received a copy of the GNU General Public License
# along with this program. If not, see http://www.gnu.org/licenses/

import code, sys
import Blender, bpy

class InteractiveConsole(code.InteractiveConsole):
def interact(self, banner=None):
try:
sys.ps1
except AttributeError:
sys.ps1 = ">>> "
try:
sys.ps2
except AttributeError:
sys.ps2 = "... "
cprt = 'Type "help", "copyright", "credits" or "license"'+\
' for more information.'
if banner is None:
self.write("Python %s on %s\n%s\n(%s)\n" %
(sys.version, sys.platform, cprt,
self.__class__.__name__))
else:
self.write("%s\n" % str(banner))
self.write('Press Ctrl-D to quit.\n')
more = 0
while 1:
try:
if more:
prompt = sys.ps2
else:
prompt = sys.ps1
try:
line = self.raw_input(prompt)
except EOFError:
self.write("\n")
break
else:
more = self.push(line)
except KeyboardInterrupt:
self.write("\nKeyboardInterrupt\n")
self.resetbuffer()
more = 0
Blender.Redraw()
Blender.Registry.SetKey('terminal.locals', self.locals)

locals = Blender.Registry.GetKey('terminal.locals')
if not locals:
locals = {'Blender':Blender, 'bpy':bpy}
console = InteractiveConsole(locals=locals)
console.interact()
To use it, you need to start Blender from a terminal (with compiz turned off):
$ blender -w
This is very important, otherwise Blender will be blocked waiting for input at an invisible terminal. The terminal console can be started from the script window: Scripts > System > Terminal. The modules 'Blender' and 'bpy' are preloaded into the console, so you don't need to import them manually. Each time a Python statement is entered, the Blender window is updated. So you can move a cube and see the result, if you type:
>>> cube = bpy.data.objects['Cube']
>>> cube.LocX = -1
You can quit the interactive console by pressing Ctrl-D. You can restart the terminal as many times as you wish and automagically all your local variables will be kept (such as 'cube' in the example).

The disadvantage is that the Blender window itself becomes unresponsive. For example you can not rotate the view during a Python console session. Also it would be much nicer to use IPython instead of the standard Python shell. However in a future blog post I'll have good news, if you want IPython integration inside Blender.

Sunday, March 8, 2009

Vector rendering with Blender in Ubuntu

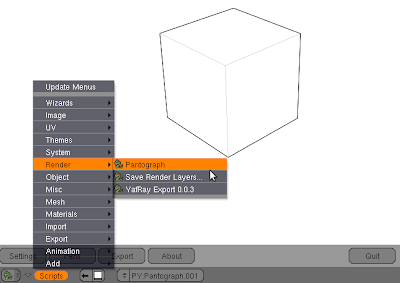
PantoGraph is a prototype for a vector rendering engine, developed in python by Severn Clay Studio. This can be nice for architectural presentations. It is still beta, which means it gets quite slow for heavy drawings.

It features two engines under the hood:
  • cairo for svg, pdf and png output
  • ming for animated flash output (.swf)
Current features :
  • Hidden- line rendering
  • Solid colors (with- and without alpha) only
  • The ability to use simple closed, convex volumes to do a boolean “cut-away”
  • Control over lineweight and color for:
    • Silhouette
    • Crease
    • Mesh
    • Hidden lines
    • Curves

  • A simple GUI that allows the saving of pens and pen settings

It can be loaded as a python script from Blender. Don't bother with the installation instructions on the Pantograph homepage (like fiddling with your PYTHONPATH), as I wrote the following install script which takes care of everything (at least in Ubuntu Intrepid). Open a new text file with the name 'install_pantograph' and copy the following content inside:
#!/bin/bash
#install most dependencies
sudo apt-get install -y python-ming python-cairo python-scipy
#install Polygon (python bindings)
wget http://download.dezentral.de/soft/Python/Polygon/Polygon-1.17.tar.gz
gzip -dc Polygon-1.17.tar.gz | tar xf -
rm Polygon-1.17.tar.gz
cd Polygon-1.17
python setup.py build
sudo python setup.py install
cd ..
rm -rf Polygon-1.17
#go to home blender dir
HOMEDIR=$HOME/.blender/scripts/
cd $HOMEDIR
#remove previous pantograph
rm pantograph*
rm progressImage.png
#install pantograph (progress image)
wget http://home.earthlink.net/~severnclay/pantograph_0.5.zip
unzip -o -j pantograph_0.5.zip progressImage.png -d ~/.blender/scripts
rm pantograph_0.5.zip
#install pantograph (bleeding edge)
wget http://home.earthlink.net/~severnclay/pantograph_bleedingEdge.zip
unzip -o -j pantograph_bleedingEdge.zip -d ~/.blender/scripts
rm pantograph_bleedingEdge.zip
#set homedir in config
cat pantographConfig.py | sed -e "s%/home/sclay/Work/Projects/pantograph/%$HOMEDIR%" > pantographConfig.py

Make the script executable, with right click (properties>permissions) in the file browser or from the terminal:
$ chmod +x install_pantograph
And run the script in the terminal as you will need to give your password to install the dependencies.
$ ./install_pantograph
After that you can access the pantograph renderer from the script window in Blender. First try it out with the default cube scene, before you let it crunch your heavy drawings.

If you want follow the progress of the render, you can better disable compiz and start Blender from a terminal, where the progress will be shown:
$ metacity --replace
$ blender -w
For feedback you can contact the developer at the blenderartists forum.

Wednesday, June 11, 2008

Howto setup dual screen for Compiz in Ubuntu Hardy

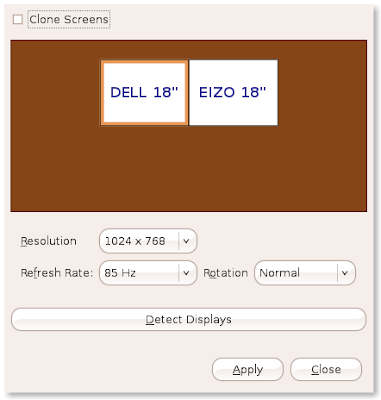
If you need to give presentations with your laptop and you are running Ubuntu Hardy, you might find that the gnome-display-properties (System>Preferences>Screen Resolution) do not work out of the box. So it is impossible to connect a beamer unless you clone. The same is true for a dual screen setup with Compiz.


There is however a very easy trick to solve this. I have tested it with an Asus Eee PC 701 4G and with my Ati Radeon X600 desktop system. I am now enjoying running dual screen with all the 3d desktops enabled.

The problem is that the default screen size configuration is too small, which does not allow you to place too screens next to each other. On the other hand Compiz can not handle texture sizes bigger than 2048x2048, which means for example two monitors of 1024x768. If you want to use bigger resolution, it is still possible, but you will need to turn off compiz and will loose the 3d effects.

So to solve it, fire up a terminal:
$ sudo cp /etc/X11/xorg.conf /etc/X11/xorg.conf.backup
$ sudo gedit /etc/X11/xorg.conf


Then find the "Screen" section and change it like this:
Section "Screen"
Identifier "Default Screen"
Monitor "Configured Monitor"
Device "Configured Video Device"
SubSection "Display"
Virtual 2048 2048
EndSubSection
EndSection


To undo, you can just type:
$ sudo cp /etc/X11/xorg.conf.backup /etc/X11/xorg.conf


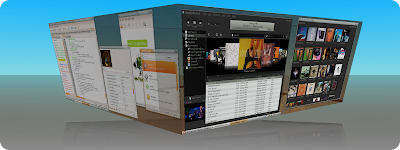
After doing this, you will be able to use gnome-display-properties with ease and run dual screen setups like this:

Monday, March 31, 2008

How to write a wxPython video player with Gstreamer

wxPython ships by default with the wx.MediaCtrl for very basic playback of music or videos. As I would like to do more advanced video manipulation, I was curious if I could use Gstreamer directly in wxPython to create my own pipelines. It was surprisingly easy.
For those who don't know Gstreamer, I quote the website (http://www.gstreamer.org):
GStreamer is a library that allows the construction of graphs of media-handling components, ranging from simple playback to complex audio (mixing) and video (non-linear editing) processing. Applications can take advantage of advances in codec and filter technology transparently.


There are python bindings for it, of which the documentation can be found on http://pygstdocs.berlios.de
I would also suggest to read these introductions to gstreamer & python:

I translated the video player example 2.2 of the tutorial from pyGtk to wxPython:
http://pygstdocs.berlios.de/pygst-tutorial/playbin.html

It should be straightforward to use this as a base for implementing your own pipelines. I work on Ubuntu, where I could install everything straight from the standard repositories.

Here is the source code:
#!/usr/bin/env python
#Example 2.2 http://pygstdocs.berlios.de/pygst-tutorial/playbin.html

import sys, os
import wx
import pygst
pygst.require("0.10")
import gst

import gobject
gobject.threads_init()

class WX_Main(wx.App):

def OnInit(self):
window = wx.Frame(None)
window.SetTitle("Video-Player")
window.SetSize((500, 400))
window.Bind(wx.EVT_CLOSE,self.destroy)
vbox = wx.BoxSizer(wx.VERTICAL)
hbox = wx.BoxSizer(wx.HORIZONTAL)
self.entry = wx.TextCtrl(window)
hbox.Add(self.entry, 1, wx.ALL|wx.ALIGN_CENTER_VERTICAL, 4)
self.button = wx.Button(window,label="Start")
hbox.Add(self.button, 0, wx.ALL|wx.ALIGN_CENTER_VERTICAL, 4)
self.button.Bind(wx.EVT_BUTTON, self.start_stop)
vbox.Add(hbox, 0, wx.EXPAND, 0)
self.movie_window = wx.Panel(window)
vbox.Add(self.movie_window,1,wx.ALL|wx.EXPAND,4)
window.SetSizer(vbox)
window.Layout()
window.Show()
self.SetTopWindow(window)

self.player = gst.element_factory_make("playbin", "player")
bus = self.player.get_bus()
bus.add_signal_watch()
bus.enable_sync_message_emission()
bus.connect('message', self.on_message)
bus.connect('sync-message::element', self.on_sync_message)

return True

def start_stop(self, event):
if self.button.GetLabel() == "Start":
filepath = self.entry.GetValue()
if os.path.exists(filepath):
self.button.SetLabel("Stop")
self.player.set_property('uri',"file://" + filepath)
self.player.set_state(gst.STATE_PLAYING)
else:
self.player.set_state(gst.STATE_NULL)
self.button.SetLabel("Start")

def on_message(self, bus, message):
t = message.type
if t == gst.MESSAGE_EOS:
self.player.set_state(gst.STATE_NULL)
self.button.SetLabel("Start")
elif t == gst.MESSAGE_ERROR:
self.player.set_state(gst.STATE_NULL)
self.button.SetLabel("Start")

def on_sync_message(self, bus, message):
if message.structure is None:
return
message_name = message.structure.get_name()
if message_name == 'prepare-xwindow-id':
imagesink = message.src
imagesink.set_property('force-aspect-ratio', True)
imagesink.set_xwindow_id(self.movie_window.GetHandle())

def destroy(self,event):
#Stop the player pipeline to prevent a X Window System error
self.player.set_state(gst.STATE_NULL)
event.Skip()

app = WX_Main()
app.MainLoop()

Thursday, November 1, 2007

How to change or recreate your Desktop folder on Ubuntu

The default location of your Desktop folder is ~/Desktop. You might prefer another location. If you by accident deleted the Dekstop folder, it will be stuck in your Trash folder as you can't put it back. These two steps enable you to change or restore your desktop folder:
gedit ~/.config/user-dirs.dirs
killall nautilus
In step 1 look for this entry: XDG_DESKTOP_DIR. Make it like this: XDG_DESKTOP_DIR="$HOME/Desktop"
Instead of step 2 you might also log off and log in again.

This is only tested on Gutsy.

Wednesday, October 31, 2007

How to install pymedia on Ubuntu (Gutsy)

"Pymedia is a Python library for accessing and manipulating media files. It makes audio and video playback/creation a snap for even a newcomer to programming." There is a deb installer available for pymedia 1.3.5 but not for 1.3.7 So I decided to write this howto.

First install all the dependencies:
sudo apt-get install python-dev libogg-dev libvorbis-dev liblame-dev libfaad2-dev libasound2-dev python-pygame
(Pygame is not really necessary, but recommended.)

Extract a download of pymedia-*.tgz and open a terminal in the extracted folder, so we can build pymedia:
python setup.py build

This should display:
Using UNIX configuration...

OGG : found
VORBIS : found
FAAD : found
MP3LAME : found
VORBISENC : found
ALSA : found
Continue building pymedia ? [Y,n]:

If everything is found press Y

Finally install pymedia:
sudo python setup.py install


Test if pymedia installed correctly by typing this at the python shell:
import pymedia


You may now proceed to the pymedia tutorials.

Sunday, March 4, 2007

How to switch between python2.4 and python2.5 on Ubuntu

The default version of python on Edgy is python2.4 and on Feisty is python2.5 If you installed both versions of python and want to switch between them you have once to type this in a terminal:
sudo update-alternatives --install /usr/bin/python python /usr/bin/python2.4 10
sudo update-alternatives --install /usr/bin/python python /usr/bin/python2.5 1
Afterwards you can choose at any time your standard python version by:
sudo update-alternatives --config python

Wednesday, February 28, 2007

SPE now works on wxPython2.8 and how to switch

Today I switched on my laptop from wxPython2.6 to wxPython2.8 SPE seemed to work quite OK already, except: the bottom panel took too much place and was not draggable to a smaller size. After fixing this annoying bug, I am happily coding now with SPE on wxPython 2.8 For those who want to try out before I release, follow the subversion instructions. I tested the new SPE on Ubuntu (wxPython 2.6 & 2.8) and on Windows (wxPython 2.8). If anybody knows a good subversion client for the Mac, please comment.

sudo wxPython 2.8 has major new features such as AUI (Advanced User Interface), anti-alias graphics (Graphicscontext) and a lot of new widgets (RichTextCtrl, CustomTreeCtrl, SearchCtrl a la Firefox, ...). This might be useful for SPE in the future, but at the moment SPE stays backwards compatible with wxPython 2.6.


On Feisty wxPython is already included in repositories, just type:
sudo apt-get install python-wxgtk2.8
On Edgy you need to use the wxPython coummunity repositories. Open /etc/apt/sources.list:
sudo gedit /etc/apt/sources.list
Add the following lines:
# wxPython APT repository at wxcommunity.com
deb http://wxpython.wxcommunity.com/apt/ubuntu/dapper /
deb-src http://wxpython.wxcommunity.com/apt/ubuntu/dapper /
Then copy and paste these lines in a terminal:
sudo apt-get update
sudo apt-get dist-upgrade
sudo apt-get install python-wxgtk2.8 python-wxtools wx2.8-i18n
If you want to use XRC gui designer, you need python-xml:
sudo apt-get install python-xml

Monday, February 26, 2007

How to download the latest SPE from subversion

If you want to have the latest version of SPE, use subversion which is very easy. (Subversion is a way for multiple people around the world to work on the same program. It keeps the changes that they make to the source code of that program in sync with each other.) Do not forget first to uninstall your previous version of SPE! Windows users can uninstall SPE through 'Add/Remove programs' in the Control Panel (look for 'python-spe*', not for 'spe') and use a subversion client (tortoisesvn, rapidsvn) to get the latest SPE. Linux and mac users need just to copy and paste this in the terminal:
svn checkout svn://svn.berlios.de/python/spe/trunk/_spe
This will create a '_spe' folder. (Do not rename it to 'spe' or another name!) From this folder you can run:
python SPE.py
To browse the subversion repository online, surf to:
http://svn.berlios.de/wsvn/python/spe/trunk/_spe/

For ubuntu: to first remove SPE, type this in the terminal:
sudo apt-get remove spe kiki wxglade
To install subversion (svn), type this in the terminal:
sudo apt-get install subversion

Instructions for Tortoise SVN (thanks Richard):
1. Go to the location you want to download SPE to
2. Right click -> SVN Checkout
3. Paste svn://svn.berlios.de/python/spe/trunk/_spe into the url field
4. Click ok and it should work.
Filter by topic: spe, python, ubuntu