Showing posts with label python. Show all posts

Sunday, April 10, 2011

Reviving the Ancient Game of Liubo 六博 as an HTML5 Multiplayer App with Google AppEngine on Python and the Channel API

What is Liubo(六博)?


One of the oldest recorded board games, Liubo, 六博, literally "six sticks" in Chinese, has a mysterious origin and even more mysterious disappearance. Emerging early in Chinese history, it was the most played game during the Han Dynasty and remained so until the emergence of Go, 围棋, in ancient China. In spite of its abundant preservation in the archeological record, and numerous historical writings describing the game, the exact rules of the game remain unknown to this very day.


Liubo: Resurrection


Fortunately, we need not leave this game in perpetual obscurity. Jean-Louis Cazaux, an author of many books on the history of chess and ancient board games, has done an extensive study of the historical and archeological record and posited a reconstruction of the rules. Furthermore, he has subjected these rules to extensive playtesting to discover a game that is quite entertaining to play.
After some exchanges with the author I've been able to implement the game he envisioned on the web with both multiplayer and AI capability.

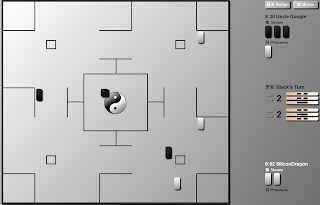
To play the game, you first sign in using an OpenID such as Google or Yahoo. Then you press "Play" and you will be placed into the game queue for another opponent. If you wish, you may press "Skip to AI" and play the AI instead. Then you will randomly play as either white or black, white goes first as in chess. Two sets of yin-yang sticks are then thrown automatically on the right side of the screen, one mark for yin and two marks for yang. Total the yang plus one for each set of three sticks, and you have your move number, for instance 3-2. This means you move 3 the first move, then 2 the second. To move, you may either enter a stone onto the board at the move number, or if the piece has not moved this turn, you may advance the stone. Advancements go counter-clockwise around the board; press the Moves button to see the move order. At two special positions, numbers 6 and 11, you may move inward towards the center and across the board. If you land directly on the center, your piece is promoted to an "owl" if you don't have one already. This owl can then capture other pieces and put them into your prison; for regular stones, captures only return the piece to the other player. You may have only one owl at a time. Capture all the opponent stones and you win; capture the opponent owl if you have no owl and you also win; have five stones on the board and no owl while your opponent has an owl and you also win; let the other side run out of the 10 minute move clock and you also win. After each game, your elo rank and that of your opponent (including the AI, "SiliconDragon") is adjusted. You may see the top rated players with the Ratings button. You can find the game here:

Click to Play Liubo 六博


HTML5 Multiplayer Design


When starting the design, I first did a static layout of the board in HTML and CSS. I wanted a design that would scale to different screen sizes so I could use it on iPad as well as various desktop sizes. Also I wanted it to work on various browsers including IE8, so I focused on using CSS drawing techniques with borders and screen percentages and tested it on various platforms. Using gradients and fallback CSS I was able to make the board, throwing sticks and pieces without using any images at all.


Once the layout was done, there remained the huge effort of programming. There are many options in creating an interactive HTML5 app today, from WebSockets, to Flash compilation to Canvas, to game-specific libraries such as Impact.js. For speed and compatibility, I chose to use div-based HTML5 javascript with jQuery. Although node.js shows promise, I prefer the established ease of use of Google AppEngine and its python backend, so I went with that. Linking the client and server is the newly released Google Channel API.


Implementing a Google Channel API Client


The trickiest part of the whole project was getting the Channel API to work properly. My first mental reset was realizing it is a unidirectional, not bidirectional, API. That is, the Channel API requires that the server give a channel token to a client and then the client connect to the server, however only the server is allowed to send messages to the client. The client is not allowed to send messages to the server over the channel. Instead, the client must use normal HTTP requests to the server which then must be matched to a client token whereby the server can send a response over the channel.


Illustrating this procedure, first here is a python snippet initiated by client request for a new channel. It runs on the appengine and creates a new channel, stores it to the datastore, and then returns the channel token along with other user data in a JSON:

def put_channel(self, user, profile):
   profile.channeltoken = 
      channel.create_channel(make_channel_id(user.federated_identity()))
   profile.channeldate = datetime.now()
   profile.put()
   profile_json = {
      'screenname': profile.screenname,
      'character': profile.character,
      'rating': profile.rating,
      'rank': compute_rank(profile.rating),
      'numgames': profile.numgames,
      'dateadded': profile.date_added.strftime('%Y-%m-%d'),
      'logoutURL': users.create_logout_url('/'),
      'channeltoken': profile.channeltoken
   }
   self.response.out.write(simplejson.dumps(profile_json))


On the javascript side, we receive this channeltoken, set our channel id to this token, and then create a new channel. We then open a socket and setup socket handlers. The socket open handler requests a new game to join. The socket message handler processes each message sent from the server, such as starting a multiplayer game and receiving moves from an opponent.

self.channel = new goog.appengine.Channel(self.channelid);
self.socket = self.channel.open();
self.socket.onopen = self.socketOnOpened;

self.socketOnOpened = function() {
   // give it a chance to startup
   setTimeout(game.requestJoin, 5000);
};

self.socketOnMessage = function(message) {
   // console.log('received message data:'+message.data);
   var messageArray = $.parseJSON(message.data);
   if (!messageArray) {
      alert('invalid message received: ' + message.data);
      return;
   }
   for (var i=0; i<messageArray.length; i++) {
      var messageline = messageArray[i];
      var command = messageline.shift();
      var data = messageline;
      self.commandProcessor.processCommand(command, data);
   }
};

Going again back to the server-side python code, we create a simple function for sending messages to the client via the channel. When creating a game, we first create a unique gamekey, then send it to the channel. Another important point to note about the Channel API is illustrated here: the server must have a different unique channel to each client it wishes to connect to. There are no broadcast channels or multiple subscribers; it is strictly one-to-one. So the server has created two channel ids, one for the white side and one for the black side, upon client connect. Then as the game progresses, messages are sent from the server to each client via its own respective channel. A unique gamekey, sent by each client during a request, allows the server to connect a request to a particular game, and thus provide a link between two clients in a multiplayer game:


def send_message(self, channelid, json):
   logging.info('sending message to:%s payload:%s',
      channelid, simplejson.dumps(json))
   channel.send_message(channelid, simplejson.dumps(json))

def create_game(self):
   self.create_gamekey()
   game = Game(parent=gamezero)
   game.gamestatus = 'WJ' # waiting for join
   game.gamecreated = datetime.now()
   game.gamekey = newline_encode(self.gamekey)
   game.gamestatus = 'GS' # game started
   game.gamestarted = datetime.now()
   game.put()
   self.send_message(self.black_channelid, [['PB'],
      ['OP',game.white_playername],['GS',self.gamekey]])
   # game started, white's move
   self.send_message(self.white_channelid, [['PW'],
      ['OP',game.black_playername],['GS',self.gamekey],['WM']])


Again returning to the client javascript side, we receive the new gamekey and begin the game. Each time after the client player moves, an HTTP POST request is sent to the server. This request contains the gamekey and the moves for this turn. We don't wait for any reply from the server to our request; instead, our previously established socket listener waits for any commands to be received via the channel API, namely, the other players moves. This methodology is how the Channel API is meant to be used in interactive applications.


self.startGame = function(data){
   $('#gamejoinstatus').html('Starting game...');
   clearTimeout(self.joinTimeout);
   game.gamekey = data[0];
   game.startGame();
}

self.sendMoves = function(moves) {
   var params = {
      gamekey: self.gamekey,
      moves: $.JSON.encode(moves)
   };
   // console.log('POST moves to server:'+params.moves);
   $.post('/games', params)
   .error(function(){
      $('#throwturn').html('Unable to send move');
   });
}

Returning to the python server side, we find our move processor. After receiving the HTTP POST request from the client with the game key and validating moves, we simply relay the move to the other player via the other player's channel id. In addition, we check for a validated game over condition:


def post(self):
   self.user = users.get_current_user()
   self.request.get('gamekey'), self.request.get('moves'))
   self.gamekey = self.request.get('gamekey')
   if not self.user or not self.gamekey:
      self.error(403)
   elif self.request.get('moves'):
      self.moves = simplejson.loads(self.request.get('moves'))
   if self.decode_gamekey():
      self.process_moves()
   else:
      self.error(403)

def process_moves(self):
   # just relay moves to the other side
   self.send_message(self.other_channelid(), self.moves);
   for move in self.moves:
      command = move[0]
      if command == 'GO': # gameover
         status = move[1]
         winner = move[2]
         reason = move[3]
         self.process_gameover(status, winner, reason)
         break

Lastly, let's see how we actually process moves on the client side. I've adopted a simple json-based symmetrical send/receive protocol, so all messages back and forth are sent as json-encoded lists. Each item in the list is itself a list, consisting of a two-character string command code and zero or more data items. The heart of this is the client command processor that receives each different command type from the server and then dispatches it to the appropriate handler:


self.processCommand = function(command, data) {
   // console.log('Command and data received: '+command+' '+data);
   switch (command) {
      case 'WJ': self.waitForJoin(); break;
      case 'OP': self.setOtherPlayer(data); break;
      case 'PW': self.setPlayer('white'); break;
      case 'PB': self.setPlayer('black'); break;
      case 'GS': self.startGame(data); break;
      case 'GO': self.gameOver(data); break;
      case 'WT': self.receiveThrow('white', data); break;
      case 'BT': self.receiveThrow('black', data); break;
      case 'WM': self.takeTurn('white'); break;
      case 'BM': self.takeTurn('black'); break;
      case 'WS': self.moveStone('white', data); break;
      case 'BS': self.moveStone('black', data); break;
      case 'WP': self.promotionMove('white', data); break;
      case 'BP': self.promotionMove('black', data); break;
      case 'WB': self.receiveBonusThrow('white'); break;
      case 'BB': self.receiveBonusThrow('black'); break;
      case 'NR': self.newRating(data); break;
      default:
   }
};


That pretty much covers how to use the Google Channel API in a multiplayer game. The good thing is I found it worked across all the platforms I tested, and at lower volumes it's completely free to use on the Google AppEngine. So you can get something up and running without spending any cash, only if it takes off do you need to front up some mulah. There are many other aspects to the game which I could elaborate if readers desire, but this has provided a good introduction to using the Channel API in your own game. Try it out:


Click to Play Liubo 六博


PS: I recommend the site HTML5Games to see the latest in HTML Indie Gaming.

Monday, February 21, 2011

How to Write an HTML5 Game in 30 Days with JQuery and Python

Kicking Ass and Taking Names


“I wanted to do in boxing what Bruce Lee was able to do in karate. Lee was an artist, and, like him, I try to get beyond the fundamentals of my sport. I want my fights to be seen as plays.” - Sugar Ray Leonard

Enough farting around. If you've been wanting to write an HTML5 game for some time now, but you were too busy trying to get a perfectly timed grenade jump on Halo 3 while munching away at the leftover Doritos that fell between the cracks in your couch cushion, then you've come to the right place. I'll show you how I did it - and in 30 days. Actually, I lied - it took exactly 33 days from starting to launch to produce Towers of Wolin. Here's how.


You've Got To Have What it Takes


“I'll think, If this is his first punch, how are the others gonna feel? That's the only fear I have for myself.” - Sugar Ray Leonard

Day one starts when you decide that in 30 days you're going to release a game. Read this article on Gamasutra about prototyping in 7 days. These guys were full time, I have a day job so I can only spend on average 2 hours a day (less on weekdays, more on weekends); this works out to around 30 days equivalent time, so that was my goal.


It's important to be realistic about it - in 30 days you're not going to make Starcraft III. Well in fact, you're never going to make Starcraft III unless you have tens of millions of dollars and hundreds of people and a huge marketing budget. What you can make is something
small, simple, and fun. Think Tetris.


Most importantly, don't be afraid to fail. Don't be afraid that people will hate your game, you, your dog, and your IDE (I prefer vim). You know what? Fuck 'em. This is your game, and even if you're the only person in the world that likes it, it's your baby. That's reward enough.


Week One: Game Design


“You have to know you can win. You have to think you can win. You have to feel you can win.” - Sugar Ray Leonard

You've got four weeks, and little wiggle time at the end. Where do you start? Game design. Many programmers miss this. An awesome technical game with a fast reactive engine that's not fun to play is still a shitty game. Likewise, artists forget that a beautiful display of visual mastery can still be boring. You're making a game, not an art museum. You need a design that is, most of all, fun. Think Angry Birds.


Week one is Game Design Week. There are a million great game ideas out there. If you're a gamer, you probably already have tons of them. When I need inspiration I head on over to HTML5games where they have a huge collection of HTML5 games, all for free, that's given me lots of ideas. But don't just think video games, think board games, children's games like Tubang Preso, sports you've played. In the time constraint of a week, you need to focus on the simple.


When I was writing Towers of Wolin, I had just come off being dazzled by WordSquared, and listening to a friend discuss his latest Settlers of Catan match. It was fuzzy, and I briefly thought of doing a Settlers clone like
gSettlers or
JSettlers, but I wanted to do my own game with a unique set of rules. So I started playing around some div tags and SVG graphics commands just to see what I could throw up on the screen, using source images from OpenClipArt. If you're good at Photoshop or Inkscape you can do this stuff yourself, but I'm not so I used SVG commands instead. I tossed in some backgrounds from CGTextures and
4FreePhotos and pretty soon I was looking at a board of hexagons with a sea background and a few different colored tiles. I wasn't sure what to do with it so I put on a few farms, fortresses, bridges, RPG stuff. I drew lines for roads, put things at the vertex. There were cool free fonts I saw at Dafont, sound effects at PacDV.
Just messing around.


Now after a few days of this I needed to figure out what the game was actually going to be. Originally I was thinking Massively Multiplayer Role Playing with resources, characters, an economy. Needless to say, such a game would take years if not decades for a single person to write. So I had to toss this out and think about what simple rules might be easy enough to implement but still fun enough to be worthwhile.

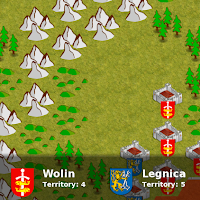
At this step in the game of making a game, Simplicity is the keyword. KISS - Keep It Simple, Stupid. At this point you'll have 1000 ideas, 100 of which are good, 10 of which are implementable. But you can only do 1 idea, so you have to toss all but one game idea, even the good ideas! You'll have a chance to do them later. Toss everything you can. I tossed characters, multiplayer, the economy, vertex drops, roads, until all I had left was a humble tower on a humble tile. There was only one action, the humble mouseclick. Click on a legal move tile and a fortress is built there. The enemy does the same. Whoever gets the most territory, wins. Game design complete.

Well, it wasn't really complete. I had to think about the level design - did I want to custom-design all my levels or do it automatic - I chose automatic using a fractal, since I'm lazy and I didn't want to play the same level over and over again, it's randomly generated each time. Also I had to think about progression - how does the game get harder, how do you advance levels - I wasn't sure but later during playtesting I just gave the AI an additional initial move with each level. There was a question of how all the graphics was going to look - some I didn't toss in until the end - but the basic sprites I needed were defined.


But in sum, it was enough to proceed to the next phase, programming.


Week Two: Programming


“Generally, the more weight you put on, the less effective you are.” - Sugar Ray Leonard

Only one week for programming? Well not exactly, you're going to be programming the whole thirty days. But your core coding needs to happen in a week. What I mean is, by the end of week two, you should have a basically playable game. It's going to have some quirks, bugs, maybe missing the splash screen and user login, but the core game mechanics should be present.


But how do we get from design to a running game skeleton? There are many paths to the goal, but first we've got to discuss platform. You should have already decided what platform you want to target - desktop, iPhone/iPad, android, browser, Xbox, Gameboy, PS3, whatever. They each have advantages and disadvantages: desktop is great for maximum power and graphics but hard to distribute; iPhone is easy to distribute and monetize but hard to port or expand; android gets you to lots of phones but limits screen space; browser can run anywhere but is harder to monetize; Xbox, Gameboy, PS3, any console device has a big market but production and distribution costs can be very high. For my game, I chose browser because I wanted to reach the maximum audience, I didn't want to front money for a Mac and a development license, and I have more experience with browser-based technologies.


Once you've picked a platform, you can start setting up the framework. I didn't know JQuery very well when I started, but it was the framework my friends at MindQuilt had the most experience with, so I knew what it could do, and I'd heard good things about how javascript has matured in the past few years. On the server side, I'd already been writing some python, and appreciated its lightweight approach compared to Java, especially with Django and Google App Engine. Plus, I wanted to play around with some of these to learn new technologies and enhance my computer hacking skills. So I got a basic app up without much difficulty.


Essentially your programming task is to convert the game design into functioning code. It's not quite that clean, because you'll revise the design and flesh out details as you're coding, but you need to think about how to implement all those fancy features in the model. A great site I recommend for this "making the dream reality" is Amit's Game Programming. What helped me the most was his excellent article on Grids. This gave me the algorithms I needed to implement a hexagonal grid, transform world to screen coordinates, and view adjacent tiles. I spent a day stuck until I realized that the origin of an HTML screen is top left, not bottom left as in Cartesian coordinates. Sometimes, we can all be dumb.


With a browser you'll need to decide on HTML divs, canvas, or flash. I tossed flash right out because I don't want proprietary stuff and it's a dead end on iPad. In comparison, getting the game to run on the iPad for me was a simple one-line inclusing of the iPad Plugin
for jQuery. Canvas is trouble on IE but otherwise lets you do almost anything you can imagine: I started with that but quickly shifted to divs when I saw an article that divs can actually be faster in some cases. There are some graphics-intensive games that can only be done in canvas, but for the tile-based game I was writing, divs work just fine and have probably a 10x or more developer productivity. With divs, you have the browser doing most of the work for you with events, lots of library support for moving things around, images, overlapping, dialogs. Canvas is more like writing a dos game back in the 1980s, you have to do everything yourself from scratch. In my case, divs were the better option.


It still gave me trouble with sound - I used JPlayer which is great on FF and Chrome but problematic on other browsers - I'm not sure what the best technology would be for a very sound-intensive game. The site MediaIo worked great for audio conversion, though.


By the way, if you're going with a browser-based approach I really recommend looking at the javascript on wordsquared, not only did they do an excellent job but the code is clear and well-written and you can see how they do lots of the "tricks" that make the site look and work good.


Enough talk, now for the meat (or soy, for you vegans, or Gagh, for you Klingons). Here's a chunk of actual jQuery javascript code from the Board class which takes a set of hexagonal tiles, and gives them a fractal elevation attribute. I use this elevation attribute later to assign territory classes: less than 0 for water, +5 for mountains, grasslands in between, etc. The background images for different territory I assign later, I converted them to pngs from svg using fileformat.info.

self.fractalNoiseTiles = function() {
            // fractal noise for tile elevations, to simulate terrain
            var persistence = 0.5;
            var octaves = 4;
            for (var octave = 1; octave < (octaves + 1); octave++) {
                // add and smooth for each octave
                self.smoothElevation(self.tiles);
                self.fractalAddElevation(self.tiles, persistence, octave);
            }
        };
        self.smoothElevation = function(tiles) {
            // apply smoothing function to elevations
            $.each(tiles, function(coordStr, tile) {
                var newElevation = tile.attr('elevation') / 2.0;
                var adjacentCoords = self.hexAdjacentCoords(tile.attr('coords'));
                // find adjacent 6 coordinates
                $.each(adjacentCoords, function(i, coordStr) {
                    if (coordStr in tiles) {
                        // if it doesn't exist, assume it's sea, so elevation 0
                        newElevation += tiles[coordStr].attr('elevation') / 6.0;
                    }
                });
                tile.attr('elevation', newElevation);
                // set current value to smoothed adjacent values
            });
        };
        self.fractalAddElevation = function(tiles, persistance, octave) {
            var scaleFactor = Math.pow(persistance, octave);
            $.each(tiles, function(coordStr, tile) {
                var amplitude = scaleFactor * (-1 + 2 * Math.random());
                // -1 to 1, continuous
                var newElevation = tile.attr('elevation')*1 + amplitude;
                tile.attr('elevation', newElevation);
            });
        }

If you're doing a single player game, as mine is, you'll need an AI. Even with a multiplayer game, you'll want to have a basic pluggable AI just for testing purposes. Now as the IBM Watson match demonstrated, AI can be a fascinating field, but also very complex and difficult. Stick to obvious things you know to avoid getting lost in cascading levels of complexity and end up in Limbo. My first AI for the game, for instance, was very simple - simply move to a random legal position. Then I enhanced this by moving to the coast first, to try and block off enemy entry points, falling back on random moving if this was impossible. Finally I made a more sophisticated AI that took into account not just good moves offensively but also how to defensively block the enemy. Still the AI is not very good, particularly in its ignorance of disclosures. But here's the code for two movers, the Coastal and Random AI movers, in my javascript Player class, to give you a feel for what an HTML5 div-based AI looks like, and how easy it can be.

self.coastalMover = function() {
            // prefer inner coast
            var numMoves = $('.valid-move')
                .not('.perimeter-tile')
                .filter(self.board.isAdjacentTo('sea-tile')).length;
            if (numMoves > 0) {
                var randomMove = Math.floor(Math.random()*numMoves);
                $('.valid-move')
                    .not('.perimeter-tile')
                    .filter(self.board.isAdjacentTo('sea-tile'))
                    .eq(randomMove)
                    .each(self.board.makeMove(self.turnComplete));
                return;
            }
            // prefer perimeter
            var numMoves = $('.valid-move.perimeter-tile').length;
            if (numMoves > 0) {
                var randomMove = Math.floor(Math.random()*numMoves);
                $('.valid-move.perimeter-tile')
                    .eq(randomMove)
                    .each(self.board.makeMove(self.turnComplete));
                return;
            }
            // otherwise make a random move
            self.randomAIMover();
        }

        self.randomAIMover = function() {
            var numValidMoves = $('.valid-move').length;
            var randomMove = Math.floor(Math.random()*numValidMoves);
            $('.valid-move')
                .eq(randomMove)
                .each(self.board.makeMove(self.turnComplete));
        }

Along with the frontend code you will need backend, server-side code. I've heard good things about Node.js, but what I had available was python on Google App Engine so I went with that. It was a lot harder to get the scoring and login code to work than I expected, but that is due more to my ignorance than any real difficulty. Once I got the hang of it, it was a breeze, especially compared to the heavy-handed lugging I'm used to with jboss and war files. Here's an extract of my backend python code for the Scores class, which grabs the top 10 scores out of the datastore and, if the user is logged in, adds on the top score and ranking for that individual user.

def get(self):
        scores = db.GqlQuery( \
            "select * from Score order by score desc limit 10")
        # fetch top scores
        scores_list = [];
        i = 1;
        for score in scores:
            username = 'anonymous'
            if (score.user is not None):
                username = score.user.nickname()
            single_score = {
                'user': username,
                'score': self.format_score(score.score),
                'date': score.date.isoformat(' '),
                'place': self.format_ordinal(i)
            }
            scores_list.append(single_score)
            i += 1
        # append your top score if logged in
        user = users.get_current_user()
        if user:
            score = db.GqlQuery( \
                "select * from Score where user=:1 order by score desc limit 1", \
                user).get()
            # fetch your top score
            if score is not None:
                scores_list.append( \
                    {'user':'','score':'','date':'','place':''})
                # spacer row
                place = db.GqlQuery( \
                    "select __key__ from Score where score > :1",\
                    score.score).count() + 1
                # fetch your top score
                single_score = {
                    'user': 'Personal Best',
                    'score': self.format_score(score.score),
                    'date': score.date.isoformat(' '),
                    'place': self.format_ordinal(place)
                }
                scores_list.append(single_score)
        self.response.out.write(simplejson.dumps(scores_list))

With your basically playable game up and running - not ready for prime time, not even close - but playable, you're reading for serious testing.

Week Three: Playtesting

“We're all given some sort of skill in life. Mine just happens to be beating up on people.” - Sugar Ray Leonard

Okay it's really just "testing", or if you're fancy and want a higher salary, "Quality Assurance", but to make it more exciting we'll call it "playtesting". That is, you get to play your game.

Now playtesting isn't just about seeing if it works. Sure, you need to find the bugs and fix them, you need to do that no doubt. But what it's even more about is discovery. The best QA people you'll find don't just run the test scripts and report the results. Instead, they prod around the limits of the application until it breaks, and try to figure out what this implies about what else might be broken, and why. Where the user experience is lousy, where I'm doing something with menus when I just want to click, and vitally, whether or not it's fun. Most importantly, discover how this implies the game could be improved to be more playable. This is what you need to do while playing the game.

When the tile game was up and running I started clicking away, saw and fixed some obvious bugs, and found out that the game wasn't very fun. It was just too easy to beat the AI. I added a few tweaks for more aggressive playing, but still it got to be boring fast, and took too long to play after it was obvious I would win (or lose). So I added an Autoplay button to speed up play when it looked like you were going to be win - but be careful! - one time I caught myself with hubris and ended up losing after pressing Autoplay. Still, just territory wasn't enough since it didn't give the kind of strategic advantage I was looking for if you capture narrow mountain passes, block off a plain, things like that. So I added the concept of "enclosures", that is, completely surrounding an area with your pieces and barrier land, which then automatically become filled with your own pieces. Not only did this add the strategic aspect, but it also sped up the game. Now, it did end up being the most difficult, time consuming, and bug filled piece of code I had to write for the whole game, but doing the enclosure calculation was not only intellectually satisfying, it ended up substantially improving playability.

There was a lot of iteration during this week of playtesting. I don't want to say agile, because I've heard that term ad naseum until it now has the same amount of meaning as "achieving key objectives with maximum leverage", but there was a lot of tweaks to the graphics, the runtime, the sounds, the rules. As the saying goes, 1% inspiration, 99% perspiration.

Week Four: Refinement

“My ambition is not to be just a good fighter. I want to be great, something special.” - Sugar Ray Leonard

Lots of good game ideas die a premature death because their authors give up towards the final stretch. That's what week four is all about - refinement. Getting your game over the hump from something that resembles a college compsci doodle, to a professional looking game. Now we're not aiming for Bungee-level storyline, thematic videos, and a model-staffed convention booth.

Refinement is what separates the men from the boys, the women from the girls, the mature transsexuals from boytoys. It's the roadwork that you have to put into the game if you want it to succeed. It's not fun, but it must be done. Do you have a splash screen? A score screen? Rules? An About page? How fast does it scroll? Does it flicker? Are the graphics lined up perfectly, or are there gaps? Does it work on different targeted platforms: iPad, Firefox, Chrome, Internet Explorer?

I had to work on all sorts of little details for the game in the refinement stage, most taking longer than I thought. I had developed in Chrome, which is the fastest browser with the best support for most HTML5 features, and it worked fine. Then I tried Firefox and it didn't work at all. I was using the jQuery rotate plugin, which doesn't work on Firefox, so I had to rethink the way I was handling tiles. Then I tried to view it on iPad, which looked horrible, so I spent a day redesigning my top-level div structure until it displayed properly. Multiple sounds had trouble on the iPad so I had to disable most sounds there, touch didn't work so I had to get the jQuery iPad plugin working properly. I didn't have a splash screen, so I had to write one, which was harder than I thought given that it has to appear before the game, after a level is completed, after the game is won or lost, with the rules, all at the right time in the right order. Scoring was even more difficult since it involved using some google APIs I wasn't familiar with, required me to upload a datastore index file, heck I even had to write a custom thousands-separator method for python since one isn't built in.

I thought about efficiency. There's a lot you can do to make a game load and run faster. I looked at the images I was using, switching to jpg instead of png for photographic-type images due to its better compression in this area. I consolidated all my javascript files into a single compact, minimized file with Google Closure Compiler. I made my CSS smaller and faster with the online YUICompressor and then switched my index.html to use the optimized versions. Some things I was using custom images for I found I could instead use existing CSS effects and jQuery functions. I was able to load public domain images off of existing sites like PicasaWeb instead of overloading my app engine. Smaller tile sizes took up less image space and ended up being easier to play with as well.

The refinement step is the biggest pain, the most frustrating, the least fun, but also the most necessary. Your users will appreciate it, and so will you.

Week Five: Release

“A fighter never knows when it's the last bell. He doesn't want to face that.” - Sugar Ray Leonard

You're game is done. Thirty days have passed - or in my case, thirty-three, because I couldn't get scores working. My fault for "leaving it to later". Next time, I'm including all elements of my game before starting playtesting, no matter how "easy" it's going to be so I don't shoot myself in the foot. But finally it was done, uploaded to google appengine, and ready to go. The game had been "knocked out", and like a boxer I was rather exhausted at the end of it all. Quite a relief.

But even being done isn't being done. I got a suggestion to add the rules section so it was clear how to play the game. I showed it to a few close confidants to get feedback. I submitted it to an HTML5 game site for inclusion on their index. And I wrote this blog post. Marketing is the fifth week in a nutshell. Let the games begin.

UPDATE: by popular demand, here is a link to the playable game: Towers of Wolin Playable Game. And here is a link to the complete sources: Towers of Wolin Source Files.

Tuesday, November 16, 2010

GFS the Google File System in 199 Lines of Python

GFS, the Google File System, sits as the backbone of the entire Google infrastructure. However, for many it is a mystery, especially for those lucky enough to be more acquainted with high-level python code than low-level C operating system sources. But have no fear, we shall break through the veil and describe an implementation of GFS in 199 lines of python. Naturally, you may want to read about the theory and design of GFS in the original Google Research GFS paper. But we will aim to give the core concepts, with real working python code, in this article. Complete runnable python 2.6 source code, if you wish it, is available at the end of this post.


A brief summary of GFS is as follows. GFS consists of three components: a client, a master, and one or more chunkservers. The client is the only user-visible, that is programmer-accessible, part of the system. It functions similarly to a standard POSIX file library. The master is a single server that holds all metadata for the filesystem. By metadata we mean the information about each file, its constituent components called chunks, and the location of these chunks on various chunkservers. The chunkservers are where the actual data is stored, and the vast majority of network traffic takes place between the client and the chunkservers, to avoid the master as a bottleneck. We will give more detailed descriptions below by going through the GFS client, master, and chunkserver as implemented in python classes, and close with a test script and its output.

The client class is the only user-visible portion of the GFS library. It mediates all requests between the client for filesystem access and the master and chunkservers for data storage and retrieval. It is important to note that GFS appears very familiar to programmers of normal filesystems, there is no distributed knowledge required. All of this is abstracted away behind the client implementation. Of course there are some exceptions to this such as the localized chunk knowledge used to allocate processing of files most efficiently, such as in the map reduce algorithm, but we have avoided such complexity in this implementation. What is most critical is to note how the normal read, write, append, exist, and delete calls are available in their common forms, and how these are implemented by the client class; we also simplify open, close and create by subsuming them under the previous methods. The gist of each method is the same: ask the master for the metadata including chunk IDs and chunk locations on the chunkservers, then update any necessary metadata with the master, and finally transaction actual data flow only with the chunkservers.

class GFSClient:
    def __init__(self, master):
        self.master = master

    def write(self, filename, data): # filename is full namespace path
        if self.exists(filename): # if already exists, overwrite
            self.delete(filename)
        num_chunks = self.num_chunks(len(data))
        chunkuuids = self.master.alloc(filename, num_chunks)
        self.write_chunks(chunkuuids, data)

    def write_chunks(self, chunkuuids, data):
        chunks = [ data[x:x+self.master.chunksize] \
            for x in range(0, len(data), self.master.chunksize) ]
        chunkservers = self.master.get_chunkservers()
        for i in range(0, len(chunkuuids)): # write to each chunkserver
            chunkuuid = chunkuuids[i]
            chunkloc = self.master.get_chunkloc(chunkuuid)
            chunkservers[chunkloc].write(chunkuuid, chunks[i])

    def num_chunks(self, size):
        return (size // self.master.chunksize) \
            + (1 if size % self.master.chunksize > 0 else 0)

    def write_append(self, filename, data):
        if not self.exists(filename):
            raise Exception("append error, file does not exist: " \
                 + filename)
        num_append_chunks = self.num_chunks(len(data))
        append_chunkuuids = self.master.alloc_append(filename, \
            num_append_chunks)
        self.write_chunks(append_chunkuuids, data)

    def exists(self, filename):
        return self.master.exists(filename)

    def read(self, filename): # get metadata, then read chunks direct
        if not self.exists(filename):
            raise Exception("read error, file does not exist: " \
                + filename)
        chunks = []
        chunkuuids = self.master.get_chunkuuids(filename)
        chunkservers = self.master.get_chunkservers()
        for chunkuuid in chunkuuids:
            chunkloc = self.master.get_chunkloc(chunkuuid)
            chunk = chunkservers[chunkloc].read(chunkuuid)
            chunks.append(chunk)
        data = reduce(lambda x, y: x + y, chunks) # reassemble in order
        return data

    def delete(self, filename):
        self.master.delete(filename)

The master class simulates a GFS master server. This is where all the metadata is stored, the core node of the entire system. Client requests initiate with the master, then after metadata is retrieved, they talk directly to the individual chunkservers. This avoids the master being a bottleneck as the metadata is typically short and low latency. The metadata is implemented as a series of dictionaries, although in a real system you'd have filesystem backing of the dicts. The notification of chunkservers becoming available and unavailable via heartbeats, chunkserver authentication and localization info for efficient storage are all simplified here so that the master itself is allocating chunkservers. However we still preserve the direct client read/write to the chunkservers, bypassing the master, to show how the distributed system is working.

class GFSMaster:
    def __init__(self):
        self.num_chunkservers = 5
        self.max_chunkservers = 10
        self.max_chunksperfile = 100
        self.chunksize = 10
        self.chunkrobin = 0
        self.filetable = {} # file to chunk mapping
        self.chunktable = {} # chunkuuid to chunkloc mapping
        self.chunkservers = {} # loc id to chunkserver mapping
        self.init_chunkservers()

    def init_chunkservers(self):
        for i in range(0, self.num_chunkservers):
            chunkserver = GFSChunkserver(i)
            self.chunkservers[i] = chunkserver

    def get_chunkservers(self):
        return self.chunkservers

    def alloc(self, filename, num_chunks): # return ordered chunkuuid list
        chunkuuids = self.alloc_chunks(num_chunks)
        self.filetable[filename] = chunkuuids
        return chunkuuids

    def alloc_chunks(self, num_chunks):
        chunkuuids = []
        for i in range(0, num_chunks):
            chunkuuid = uuid.uuid1()
            chunkloc = self.chunkrobin
            self.chunktable[chunkuuid] = chunkloc
            chunkuuids.append(chunkuuid)
            self.chunkrobin = (self.chunkrobin + 1) % self.num_chunkservers
        return chunkuuids

    def alloc_append(self, filename, num_append_chunks): # append chunks
        chunkuuids = self.filetable[filename]
        append_chunkuuids = self.alloc_chunks(num_append_chunks)
        chunkuuids.extend(append_chunkuuids)
        return append_chunkuuids

    def get_chunkloc(self, chunkuuid):
        return self.chunktable[chunkuuid]

    def get_chunkuuids(self, filename):
        return self.filetable[filename]

    def exists(self, filename):
        return True if filename in self.filetable else False

    def delete(self, filename): # rename for later garbage collection
        chunkuuids = self.filetable[filename]
        del self.filetable[filename]
        timestamp = repr(time.time())
        deleted_filename = "/hidden/deleted/" + timestamp + filename
        self.filetable[deleted_filename] = chunkuuids
        print "deleted file: " + filename + " renamed to " + \
             deleted_filename + " ready for gc"

    def dump_metadata(self):
        print "Filetable:",
        for filename, chunkuuids in self.filetable.items():
            print filename, "with", len(chunkuuids),"chunks"
        print "Chunkservers: ", len(self.chunkservers)
        print "Chunkserver Data:"
        for chunkuuid, chunkloc in sorted(self.chunktable.iteritems(), key=operator.itemgetter(1)):
            chunk = self.chunkservers[chunkloc].read(chunkuuid)
            print chunkloc, chunkuuid, chunk

The chunkserver class is the smallest in this project. This represents an actual distinct box running in a massive datacenter, connected to a network reachable by the master and client. In GFS, the chunkservers are relatively "dumb" in that they know only about chunks, that is, the file data broken up into pieces. They don't see the whole picture of the entire file, where it is across the whole filesystem, the associated metadata, etc. We implement this class as a simple local storage, which you can examine after running the test code by looking at the directory path "/tmp/gfs/chunks". In a real system you'd want persistent storage of the chunk info for backup.

class GFSChunkserver:
    def __init__(self, chunkloc):
        self.chunkloc = chunkloc
        self.chunktable = {}
        self.local_filesystem_root = "/tmp/gfs/chunks/" + repr(chunkloc)
        if not os.access(self.local_filesystem_root, os.W_OK):
            os.makedirs(self.local_filesystem_root)

    def write(self, chunkuuid, chunk):
        local_filename = self.chunk_filename(chunkuuid)
        with open(local_filename, "w") as f:
            f.write(chunk)
        self.chunktable[chunkuuid] = local_filename

    def read(self, chunkuuid):
        data = None
        local_filename = self.chunk_filename(chunkuuid)
        with open(local_filename, "r") as f:
            data = f.read()
        return data

    def chunk_filename(self, chunkuuid):
        local_filename = self.local_filesystem_root + "/" \
            + str(chunkuuid) + '.gfs'
        return local_filename

We use main() as a test for all the client methods, including exceptions. We first create a master and client object, then write a file. This write is performed by the client in the same way as the real GFS: first it gets the chunk metadata from the master, then writes chunks directly to each chunkserver. Append functions similarly. Delete is handled in the GFS fashion, where it renames the file to a hidden namespace and leaves it for later garbage collection. A dump displays metadata content. Note that this is a single-threaded test, as this demonstration program does not support concurrency, although that could be added with appropriate locks around the metadata.

def main():
    # test script for filesystem

    # setup
    master = GFSMaster()
    client = GFSClient(master)

    # test write, exist, read
    print "\nWriting..."
    client.write("/usr/python/readme.txt", """
        This file tells you all about python that you ever wanted to know.
        Not every README is as informative as this one, but we aim to please.
        Never yet has there been so much information in so little space.
        """)
    print "File exists? ", client.exists("/usr/python/readme.txt")
    print client.read("/usr/python/readme.txt")

    # test append, read after append
    print "\nAppending..."
    client.write_append("/usr/python/readme.txt", \
        "I'm a little sentence that just snuck in at the end.\n")
    print client.read("/usr/python/readme.txt")

    # test delete
    print "\nDeleting..."
    client.delete("/usr/python/readme.txt")
    print "File exists? ", client.exists("/usr/python/readme.txt")

    # test exceptions
    print "\nTesting Exceptions..."
    try:
        client.read("/usr/python/readme.txt")
    except Exception as e:
        print "This exception should be thrown:", e
    try:
        client.write_append("/usr/python/readme.txt", "foo")
    except Exception as e:
        print "This exception should be thrown:", e

    # show structure of the filesystem
    print "\nMetadata Dump..."
    print master.dump_metadata()

And putting it all together, here is the output of the test script run from the python interpreter. Pay special attention to the master metadata dump at the end, where you can see how the chunks are spread across chunkservers in jumbled order, only to be reassembled by the client in the order specified by the master metadata.

$ python gfs.py

Writing...
File exists?  True

        This file tells you all about python that you ever wanted to know.
        Not every README is as informative as this one, but we aim to please.
        Never yet has there been so much information in so little space.


Appending...

        This file tells you all about python that you ever wanted to know.
        Not every README is as informative as this one, but we aim to please.
        Never yet has there been so much information in so little space.
        I'm a little sentence that just snuck in at the end.


Deleting...
deleted file: /usr/python/readme.txt renamed to /hidden/deleted/1289928955.7363091/usr/python/readme.txt ready for gc
File exists?  False

Testing Exceptions...
This exception should be thrown: read error, file does not exist: /usr/python/readme.txt
This exception should be thrown: append error, file does not exist: /usr/python/readme.txt

Metadata Dump...
Filetable: /hidden/deleted/1289928955.7363091/usr/python/readme.txt with 30 chunks
Chunkservers:  5
Chunkserver Data:
0 f76734ce-f1a7-11df-b529-001d09d5b664 mation in
0 f7671750-f1a7-11df-b529-001d09d5b664  you ever
0 f7670bd4-f1a7-11df-b529-001d09d5b664
        T
0 f767b656-f1a7-11df-b529-001d09d5b664 le sentenc
0 f7672182-f1a7-11df-b529-001d09d5b664  is as inf
0 f7672b0a-f1a7-11df-b529-001d09d5b664 se.

1 f767b85e-f1a7-11df-b529-001d09d5b664 e that jus
1 f76736b8-f1a7-11df-b529-001d09d5b664 so little
1 f767193a-f1a7-11df-b529-001d09d5b664 wanted to
1 f7670f3a-f1a7-11df-b529-001d09d5b664 his file t
1 f767236c-f1a7-11df-b529-001d09d5b664 ormative a
1 f7672cf4-f1a7-11df-b529-001d09d5b664   Never ye
2 f7671b2e-f1a7-11df-b529-001d09d5b664 know.

2 f7671142-f1a7-11df-b529-001d09d5b664 ells you a
2 f767ba48-f1a7-11df-b529-001d09d5b664 t snuck in
2 f7672556-f1a7-11df-b529-001d09d5b664 s this one
2 f76738e8-f1a7-11df-b529-001d09d5b664 space.

2 f7672ee8-f1a7-11df-b529-001d09d5b664 t has ther
3 f767bcb4-f1a7-11df-b529-001d09d5b664  at the en
3 f7671d40-f1a7-11df-b529-001d09d5b664     Not ev
3 f76730d2-f1a7-11df-b529-001d09d5b664 e been so
3 f7673adc-f1a7-11df-b529-001d09d5b664
3 f767135e-f1a7-11df-b529-001d09d5b664 ll about p
3 f7672740-f1a7-11df-b529-001d09d5b664 , but we a
4 f7672920-f1a7-11df-b529-001d09d5b664 im to plea
4 f767b3f4-f1a7-11df-b529-001d09d5b664 I'm a litt
4 f767bea8-f1a7-11df-b529-001d09d5b664 d.

4 f7671552-f1a7-11df-b529-001d09d5b664 ython that
4 f76732e4-f1a7-11df-b529-001d09d5b664 much infor
4 f7671f8e-f1a7-11df-b529-001d09d5b664 ery README

Now of course we are lacking some of the complexities of GFS necessary for a fully functional system: metadata locking, chunk leases, replication, master failover, localization of data, chunkserver heartbeats, deleted file garbage collection.  But what we have here demonstrates the gist of GFS and will help give you a better understanding of the basics.  It can also be a starting point for your own explorations into more detailed distributed filesystem code in python.

Full source code can be downloaded here: gfs.py

Wednesday, October 6, 2010

Google's MapReduce in 98 Lines of Python

MapReduce is the magic sauce that makes Google run.  Not just search but a large part of their infrastructure is programmed in this paradigm.  If you want to see how this can be implemented in python, read on.

Lately I've been not only learning more python but also learning about the MapReduce algorithm. Naturally I started with the many freely available web resources, from brief overviews to instructive video tutorials to detailed Google Research articles on MapReduce.

This is all well and fine but I wanted to know how to actually write MapReduce applications in python, and to obtain a better understanding of the magic behind the algorithm itself.  I found a small python multi-server implementation of MapReduce named mincemeat, another called octopy, as well as interfaces to large non-python systems such as Hadoop.  However I was still unable to find a quick and dirty implementation of MapReduce that was high-level, concise, easy to run, easy to understand, and relevant.  So I wrote one.

To fulfill my requirement of high-level, I wanted to actually use python-native lists, tuples, queues, and threading.  I didn't want to get stuck with low-level socket communication and endless writing and parsing of intermediate flat files.  To fulfill my requirement of concise, I wanted the whole MapReduce algorithm to be implemented in a single python class of 100 lines of code or less, and we're talking properly well-formatted python code, not a series of Perl one-liners.  To fulfill my requirement that it be easy to run, I should be able to put the whole thing in one python file and call it from the command line with a python interpreter.  It should only use the python 2.6+ standard library so there is nothing you should have to install if you already have python.  Nor should you need to setup a multi-server environment, multiple servers on a network, you should be able to run it on a single machine while still observing multiple simultaneous map and reduce work tasks.  To fulfill my requirement that it be easy to understand, it should accurately and clearly implement the major steps of MapReduce, with comments where necessary.  One should be able to insert print statements of the intermediate steps at any point in the computation and see exactly what is going on.  To fulfill my requirement of relevant code, not just an academic exercise, I wanted actual python source code examples running the MapReduce class on real data.

That being said, it is important to know what this implementation of MapReduce in python is not.  It is not web-scale without significant changes - in 100 lines of code there is only so much one can do.  It does not implement some significant reliability provisions Google uses such as distributed multiple-copy data and monitored task restarts.  It does not handle mapper-reducer pairing and partitioning for grouped calculations.  It ignores the important principle of locality to dispatch particular workers to machines where applicable data already resides.  It bypasses the key efficiency step of combiners to aid in the speed of reducing tasks.  It loads the data directly from the internet or local disk and stores intermediate results in memory instead of using a distributed filesystem like GFS or HDFS. It doesn't support differing numbers of parse, map, merge, sort, reduce, and output functions with varying resource allocations to each. And last but not least, it bases its multiple worker implementation on python threading with the Thread and synchronized Queue coordinating classes.  This means that while in theory there is nothing to prevent an interface-identical implementation of these python standard classes which are distributed across thousands of machines, as written the code runs all the workers only on a single machine.

But enough talk.  It's time to show the goods.  Let's see some code.
import threading
import Queue
import operator
import urllib
import re

class MapReduce:
    ''' MapReduce - to use, subclass by defining these functions,
                    then call self.map_reduce():
        parse_fn(self, k, v) => [(k, v), ...]
        map_fn(self, k, v) => [(k, v1), (k, v2), ...]
        reduce_fn(self, k, [v1, v2, ...]) => [(k, v)]
        output_fn(self, [(k, v), ...])
    '''
    def __init__(self):
        self.data = None
        self.num_worker_threads = 5

    class SynchronizedDict(): # we need this for merging
        def __init__(self):
            self.lock = threading.Lock()
            self.d = {}
        def isin(self, k):
            with self.lock:
                if k in self.d:
                    return True
                else:
                    return False
        def get(self, k):
            with self.lock:
                return self.d[k]
        def set(self, k, v): # we don't need del
            with self.lock:
                self.d[k] = v
        def set_append(self, k, v): # for thread-safe list append
            with self.lock:
                self.d[k].append(v)
        def items(self):
            with self.lock:
                return self.d.items()

    def create_queue(self, input_list): # helper fn for queues
        output_queue = Queue.Queue()
        for value in input_list:
            output_queue.put(value)
        return output_queue

    def create_list(self, input_queue): # helper fn for queues
        output_list = []
        while not input_queue.empty():
            item = input_queue.get()
            output_list.append(item)
            input_queue.task_done()
        return output_list

    def merge_fn(self, k, v, merge_dict): # helper fn for merge
        if merge_dict.isin(k):
            merge_dict.set_append(k, v)
        else:
            merge_dict.set(k, [v])

    def process_queue(self, input_queue, fn_selector): # helper fn
        output_queue = Queue.Queue()
        if fn_selector == 'merge':
            merge_dict = self.SynchronizedDict()
        def worker():
            while not input_queue.empty():
                (k, v) = input_queue.get()
                if fn_selector in ['map', 'reduce']:
                    if fn_selector == 'map':
                        result_list = self.map_fn(k, v)
                    elif fn_selector == 'reduce':
                        result_list = self.reduce_fn(k, v)
                    for result_tuple in result_list: # flatten
                        output_queue.put(result_tuple)
                elif fn_selector == 'merge': # merge v to same k
                    self.merge_fn(k, v, merge_dict)
                else:
                    raise Exception, "Bad fn_selector="+fn_selector
                input_queue.task_done()
        for i in range(self.num_worker_threads): # start threads
            worker_thread = threading.Thread(target=worker)
            worker_thread.daemon = True
            worker_thread.start()
        input_queue.join() # wait for worker threads to finish
        if fn_selector == 'merge':
            output_list = sorted(merge_dict.items(), key=operator.itemgetter(0))
            output_queue = self.create_queue(output_list)
        return output_queue

    def map_reduce(self): # the actual map-reduce algoritm
        data_list = self.parse_fn(self.data)
        data_queue = self.create_queue(data_list) # enqueue the data so we can multi-process
        map_queue = self.process_queue(data_queue, 'map') # [(k,v),...] => [(k,v1),(k,v2),...]
        merge_queue = self.process_queue(map_queue, 'merge') # [(k,v1),(k,v2),...] => [(k,[v1,v2,...]),...]
        reduce_queue = self.process_queue(merge_queue, 'reduce') # [(k,[v1,v2,...]),...] => [(k,v),...]
        output_list = self.create_list(reduce_queue) # deque into list for output handling
        self.output_fn(output_list)

Well, there you have it. Google's MapReduce, with all my caveats of course, in less than 100 lines of python code, 98 lines to be precise which includes imports and spacing lines. Of course just the class itself isn't very useful without some examples to see how it works, so I've included a WordCount example below:

class WordCount(MapReduce):

    def __init__(self):
        MapReduce.__init__(self)
        self.min_count = 1

    def parse_fn(self, data): # break string into [(k, v), ...] tuples for each line
        data_list = map(lambda line: (None, line), data.splitlines())
        return data_list

    def map_fn(self, key, str): # return (word, 1) tuples for each word, ignore key
        word_list = []
        for word in re.split(r'\W+', str.lower()):
            bare_word = re.sub(r"[^A-Za-z0-9]*", r"", word);
            if len(bare_word) > 0:
                word_list.append((bare_word, 1))
        return word_list

    def reduce_fn(self, word, count_list): # just sum the counts
        return [(word, sum(count_list))]

    def output_fn(self, output_list): # just print the resulting list
        print "Word".ljust(15), "Count".rjust(5)
        print "______________".ljust(15), "_____".rjust(5)
        sorted_list = sorted(output_list, key=operator.itemgetter(1), reverse=True)
        for (word, count) in sorted_list:
            if count > self.min_count:
                print word.ljust(15), repr(count).rjust(5)
        print

    def test_with_monty(self):
        self.data = """The Meaning of Life is:
            try and be nice to people,
            avoid eating fat,
            read a good book every now and then,
            get some walking in,
            and try and live together in peace and harmony
            with people of all creeds and nations."""
        self.map_reduce()

    def test_with_nietzsche(self):
        self.min_count = 700
        f = urllib.urlopen("http://www.gutenberg.org/cache/epub/7205/pg7205.txt")
        self.data = f.read()
        f.close()
        self.map_reduce()


Another one which will help you understand better how to use map keys throughout the computation is DistributedGrep, which really has a different feel from WordCount, which I've included below:

class DistributedGrep(MapReduce):

    def __init__(self):
        MapReduce.__init__(self)
        self.matcher = None

    def parse_fn(self, data): # one list item per line with line number
        data_list = []
        line_num = 1
        for line in data.splitlines():
            data_list.append((line_num, line))
            line_num = line_num + 1
        return data_list

    def map_fn(self, line_num, line): # return line if matches, include line num
        matcher = self.matcher
        matched_line = []
        if matcher.match(line):
            matched_line = [(line_num, line)]
        return matched_line

    def reduce_fn(self, line_num, line_list): # identity reducer
        return [(line_num, line_list[0])] # we only ever have one line in the list

    def output_fn(self, output_list): # just print the resulting list
        print "LineNum".rjust(8), "Line".ljust(70)
        print "_______".rjust(8), "____"
        for (line_num, line) in sorted(output_list, key=operator.itemgetter(0)):
            print repr(line_num).rjust(8), line.ljust(70)
        print

    def test_with_nietzsche(self):
        self.matcher = re.compile(r".*Jahre.*")
        f = urllib.urlopen("http://www.gutenberg.org/cache/epub/7205/pg7205.txt")
        self.data = f.read()
        f.close()
        self.map_reduce()

Of course none of this is useful if you can't actually run the code, so here's a main function below with the two examples classes run in test execution:

def main():
    wc = WordCount()
    wc.test_with_monty()
    wc.test_with_nietzsche()

    dg = DistributedGrep()
    dg.test_with_nietzsche()

if __name__ == "__main__":
    main()

You can paste all the following code snippets above into one file and run that in any python 2.6+ interpreter, and it should output results something like the following:

$ python map_reduce.py

Word            Count
______________  _____
and                 6
in                  2
of                  2
people              2
try                 2

Word            Count
______________  _____
und              3992
der              2022
ich              1714
die              1459
ist              1179
das              1103
nicht             985
zu                947
es                872
aber              857
du                856
er                854
sie               786
ihr               769
den               751
ein               746

 LineNum Line
 _______ ____
     168 Zehn Jahre kamst du hier herauf zu meiner Höhle: du würdest deines
     209 Nicht fremd ist mir dieser Wanderer: vor manchen Jahre gieng er her
    3198 Also vergiengen dem Einsamen Monde und Jahre; seine Weisheit aber
    4585 und unverändert durch die Jahre.
    9285 von grossem Jahre: das muss sich, einer Sanduhr gleich, immer wieder
    9288 - so dass alle diese Jahre sich selber gleich sind, im Grössten und
    9289 auch im Kleinsten, - so dass wir selber in jedem grossen Jahre uns
    9816 - Und wieder liefen Monde und Jahre über Zarathustra's Seele, und er
    9931 tausend Jahren - -
   10801 Meine Liebe diente ihm lange Jahre, mein Wille gierig allem seinen


To better understand the algorithm, I'd recommend going through just the first test case for WordCount which is small enough to see exactly what is happening at every step but real enough to see a genuine useful calculation in progress. You can insert print statements for the various queues, lists and tuples at each step to see exactly what is going on. In fact although I spent days studying MapReduce as an abstract algorithm and looking at code implementations, I didn't really understand it until I did this exercise of stepping through the code, which in my case was also debugging it.

Then once you've done that with the first simple test case you can try the larger WordCount corpus which is a full-size work by Nietzsche in the original German. Since the data is too large to print out all at once, I recommend only printing the first 10 items or so for each step of the process so you can see what's going on with a bigger example. Then after that you can try DistributedGrep which is an entirely different algorithm, with both a different feel and implementation, so you can move beyond the introductory word counting and see how other types of processes can be implemented in MapReduce as well.

So that's it folks, I hope you enjoy it. Improvements, additional requests, criticisms, and flames are all equally welcome. I'm especially interested in finding some more python example algorithms that can be implemented in MapReduce in a page or two, particularly ones outside what you might normally see in the standard corpus. If there's enough interest I'll do some additional examples myself and follow up in a subsequent post.

PS Thanks to MoinMoin for the html color markup program for python.

Full source code can be downloaded here: map_reduce.py